


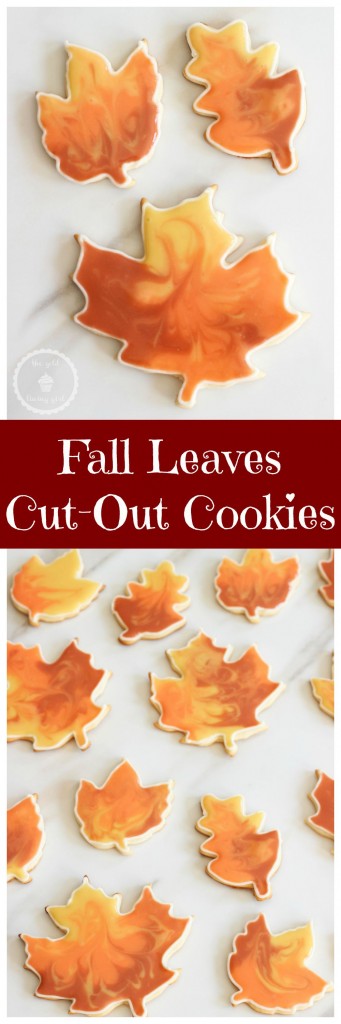
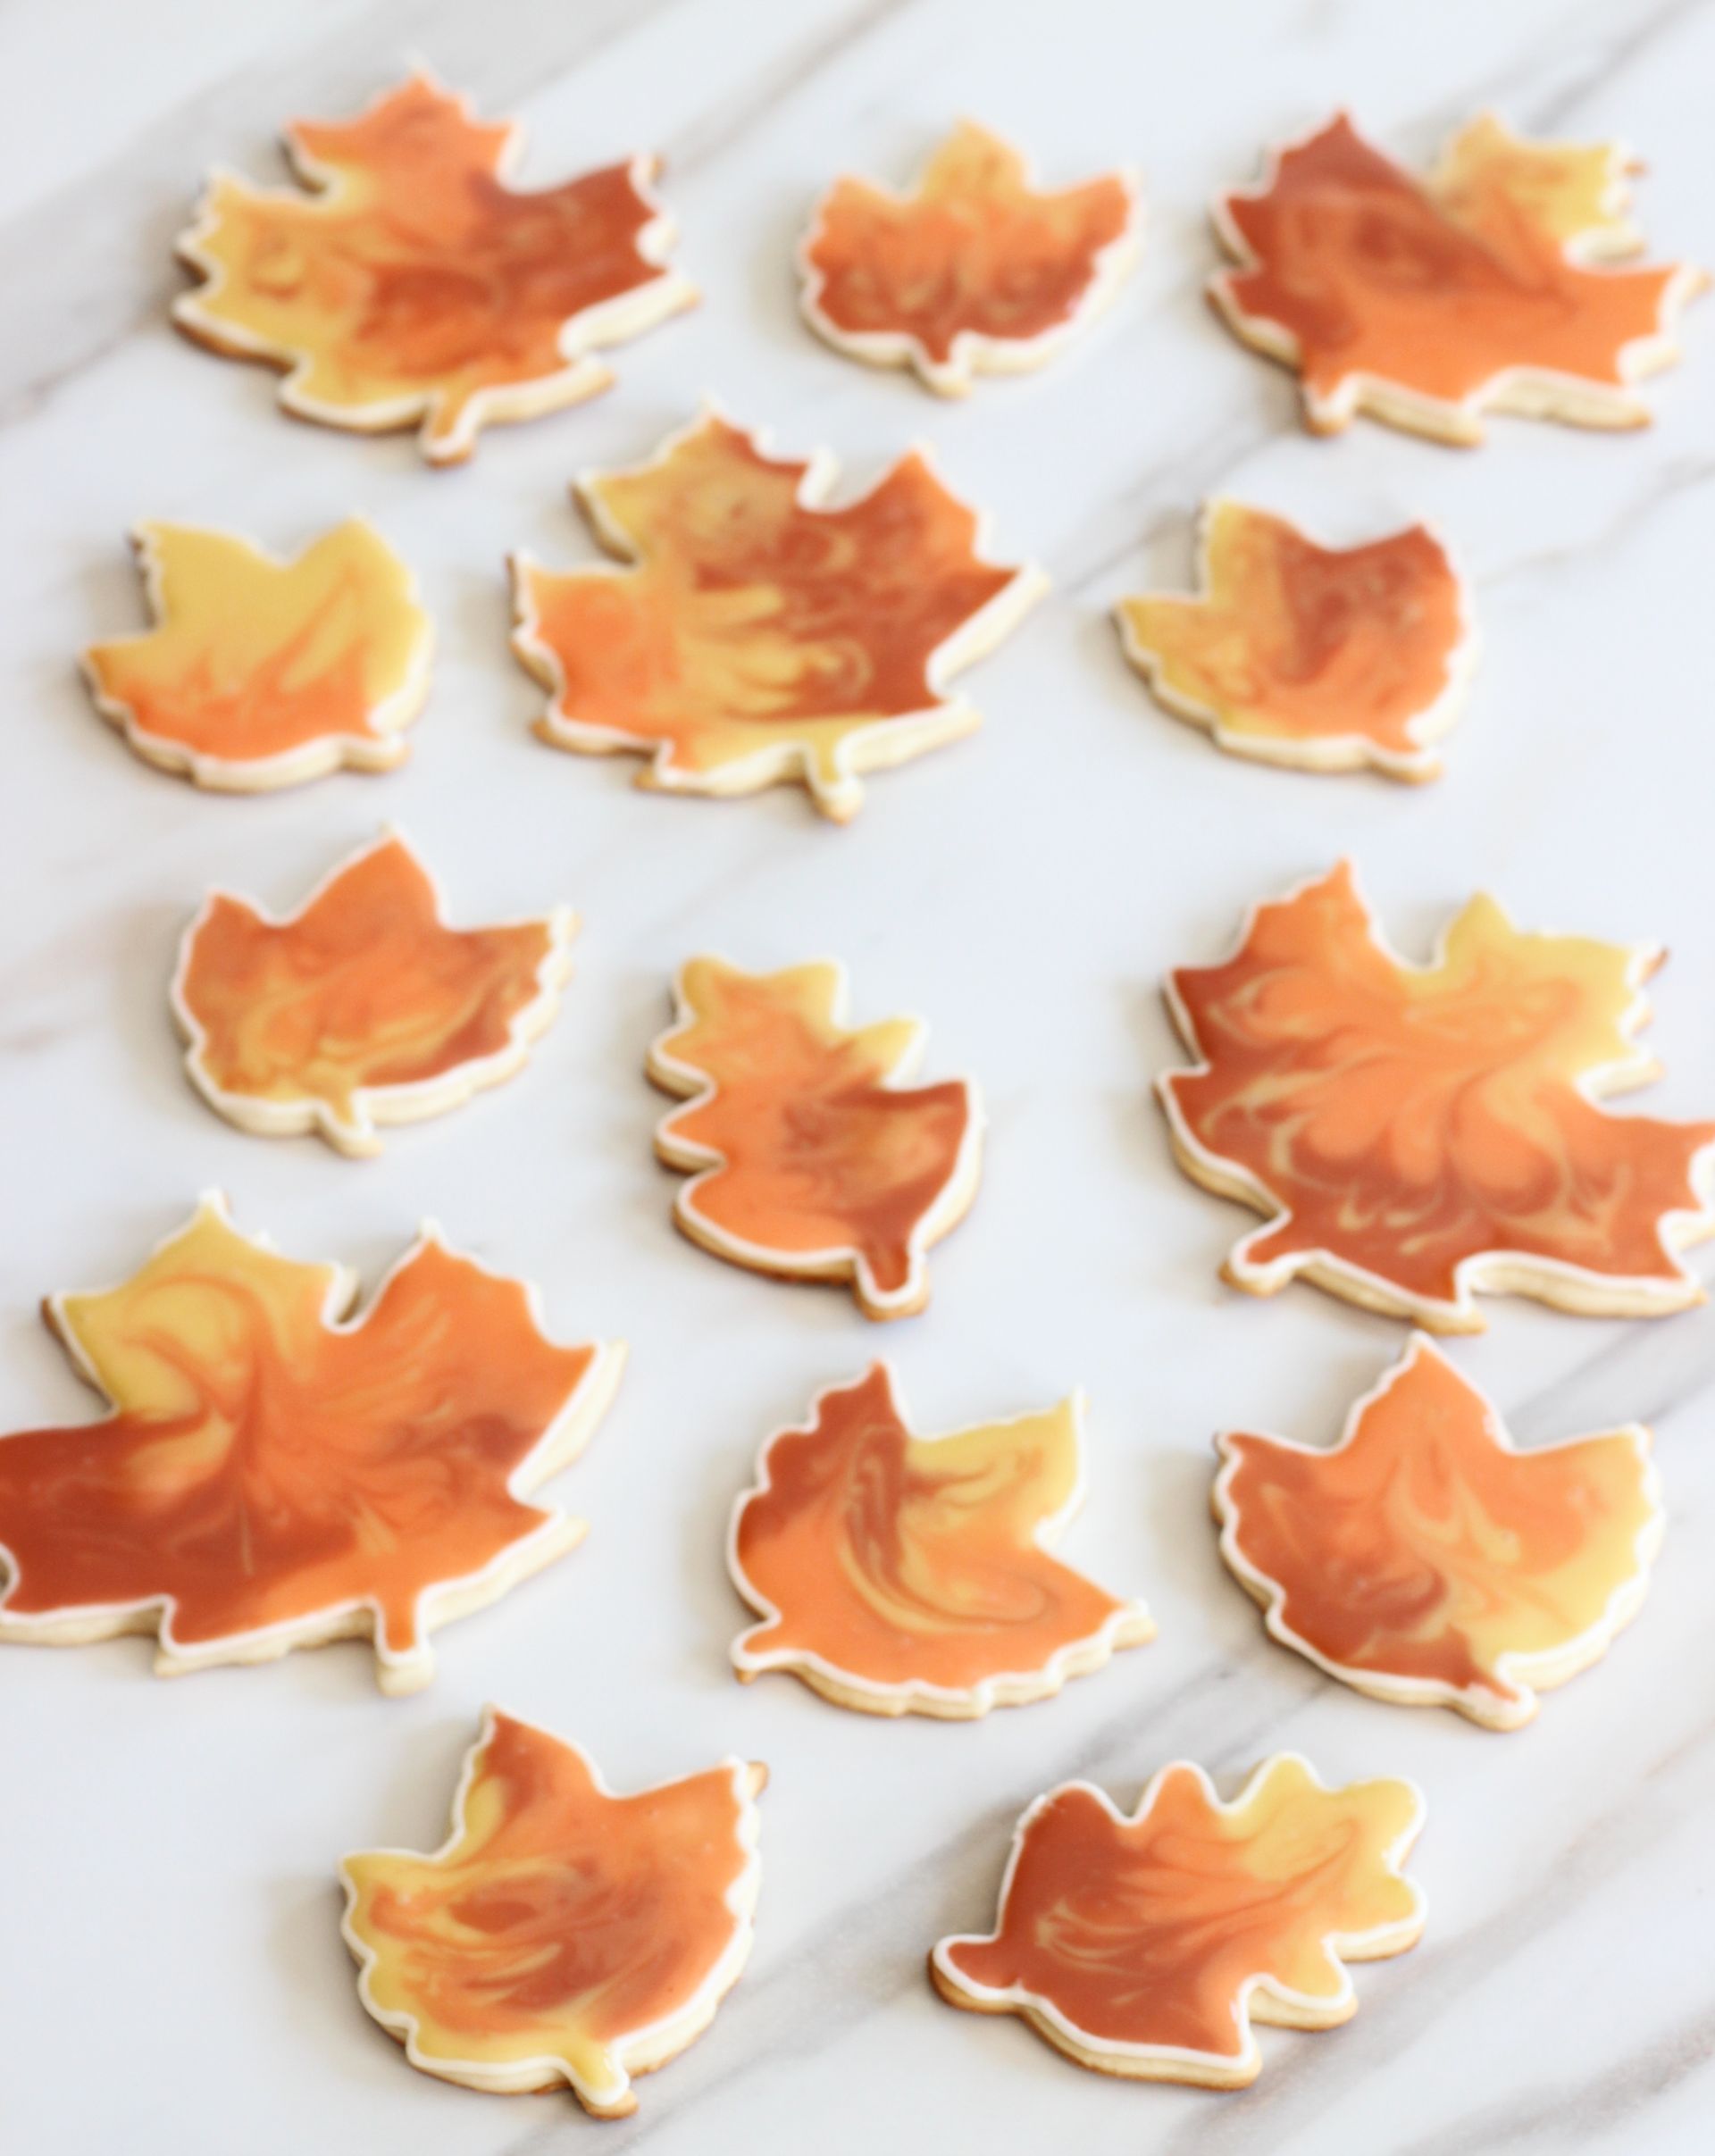
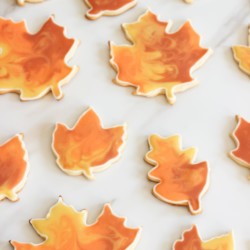
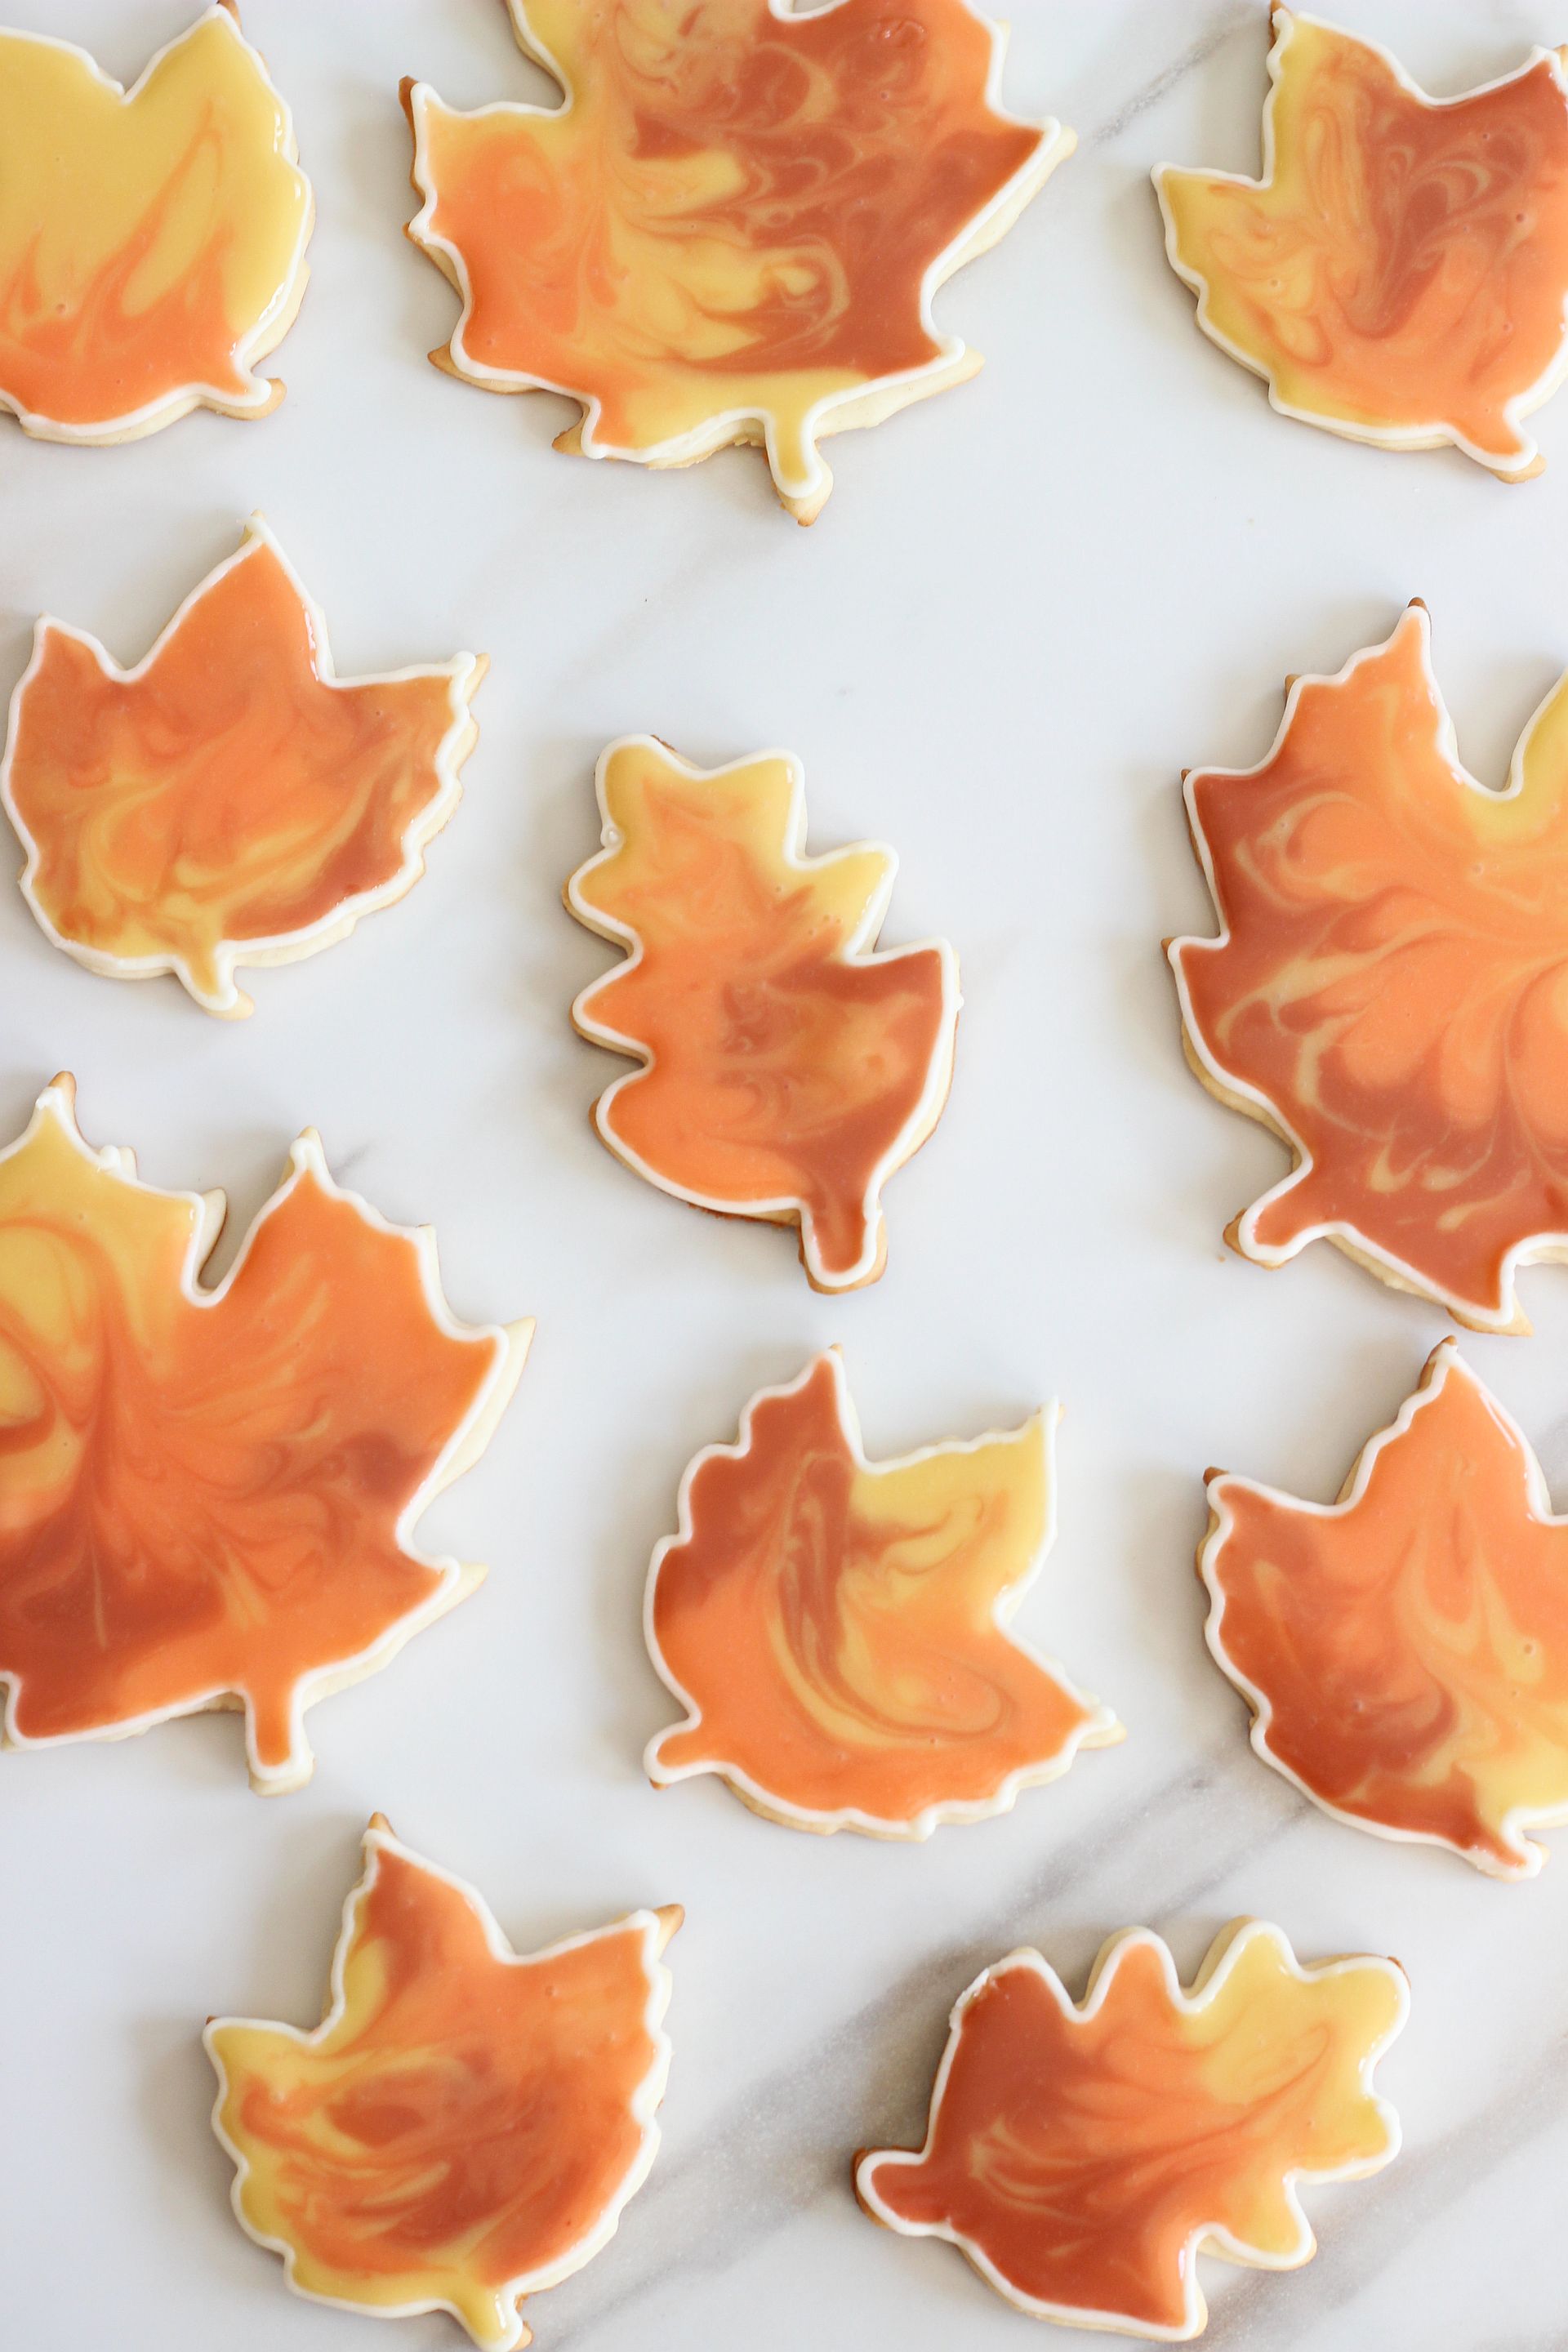
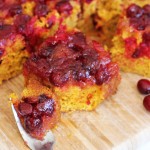
These beautiful sugar cookie cutouts resemble changing fall leaves! Aren’t they gorgeous? Using cookie flooding as the cookie decorating technique, you can recreate these lovely fall leaves sugar cookies!

I can’t contain my excitement about today’s subject. This method of cookie decorating is my favorite. If there’s an occasion where you really want to impress, and make beautiful and elegant cookies, try cookie flooding.
I’m not going to tell you that this is a super quick and fast cookie decorating technique. That would be a falsehood. I also don’t suggest you attempt this activity the day after a friend’s birthday bash when you’re a wee bit hungover from too much vino, but still drank 4 cups of coffee that morning anyway, so you’re also on a jittery caffeine high. Bad idea. In other words, don’t be like me.
Also, don’t try doing this while simultaneously making toast in your regular oven because your toaster oven is broken. Eeeeesh. What was I thinking? Disasters abounded when I set out to decorate these cookies yesterday, but once I decided that Gatorade was a better beverage choice, and that a simple, old-fashioned peanut butter sandwich would suffice instead of being all fancy by making toast, I was ready to roll.
As long as the previously mentioned conditions aren’t met, this fun method of cookie decorating will be smooth sailing for you. Just… seriously, don’t be like me.
It’s not hard at all to do cookie flooding. It’s really not at all. It is more time-consuming than regular frosted cookies, BUT, and it’s huge but, it’s reaaaaally, truly fun. It’s not difficult and it’s totally enjoyable. Plus, look at ’em!
The results will shock people. They won’t believe that these are actual cookies because they look like works of art. I mean, don’t mine look like miniature Van Goghs?? People will not believe they are even edible because they are so darn pretty! People, like S.O., will be astonished that such a method of decorating cookies even exists. The reactions are well worth the extra time commitment.

If you’ve never tried cookie flooding, you need to. Let’s get to it, shall we?
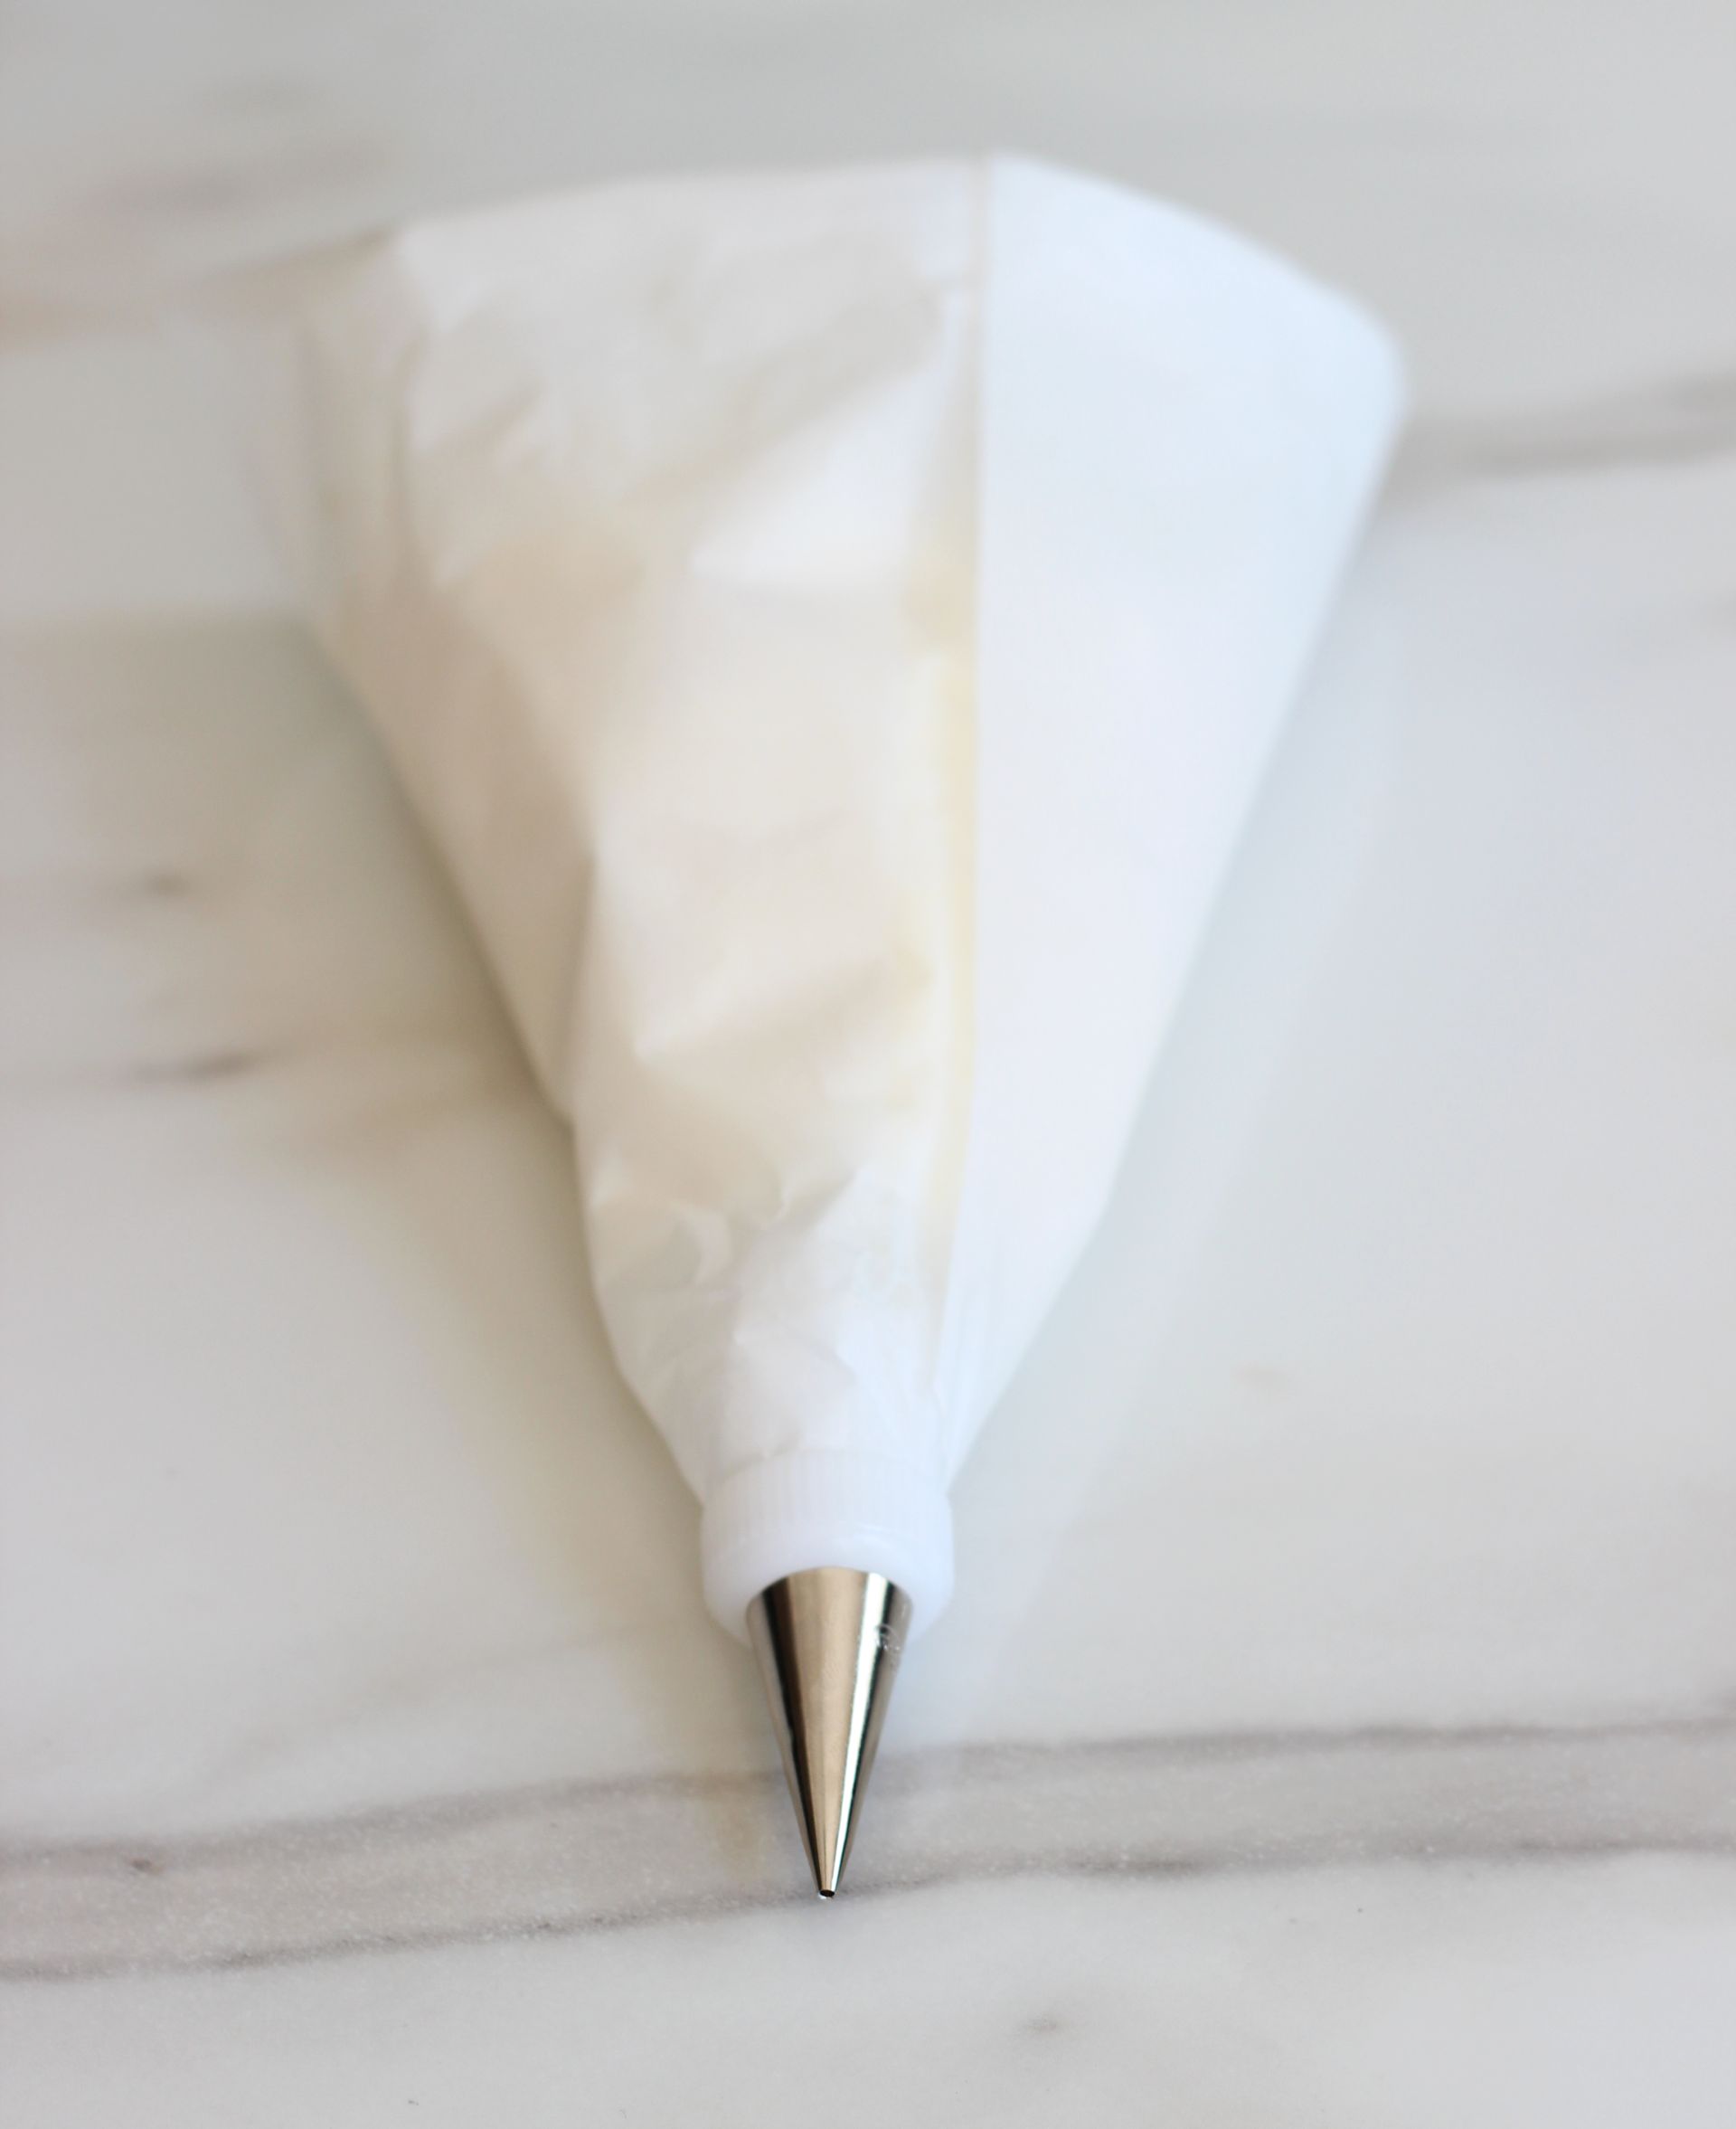
A few notes before we get started: You’ll need sugar cookies (use any recipe you’d like, my favorite family recipe for cutouts is below), and two kinds of icing – buttercream and royal icing. If you’re anything like me, you probably always have leftover buttercream when you make it, so there’s extra sitting in your freezer. You don’t need much (about 1 cup), so it’s a great time to use up some leftover. It’s also very helpful to have a piping bag. I’ve substituted in the past with sandwich baggies by cutting a tiny hole in the corner, and that’s workable, but a piping bag is much easier.
I’m going to let the pictures do most of the talking here, because you can get a good gist just by viewing the photos, but the general process for the decorating component is as follows:
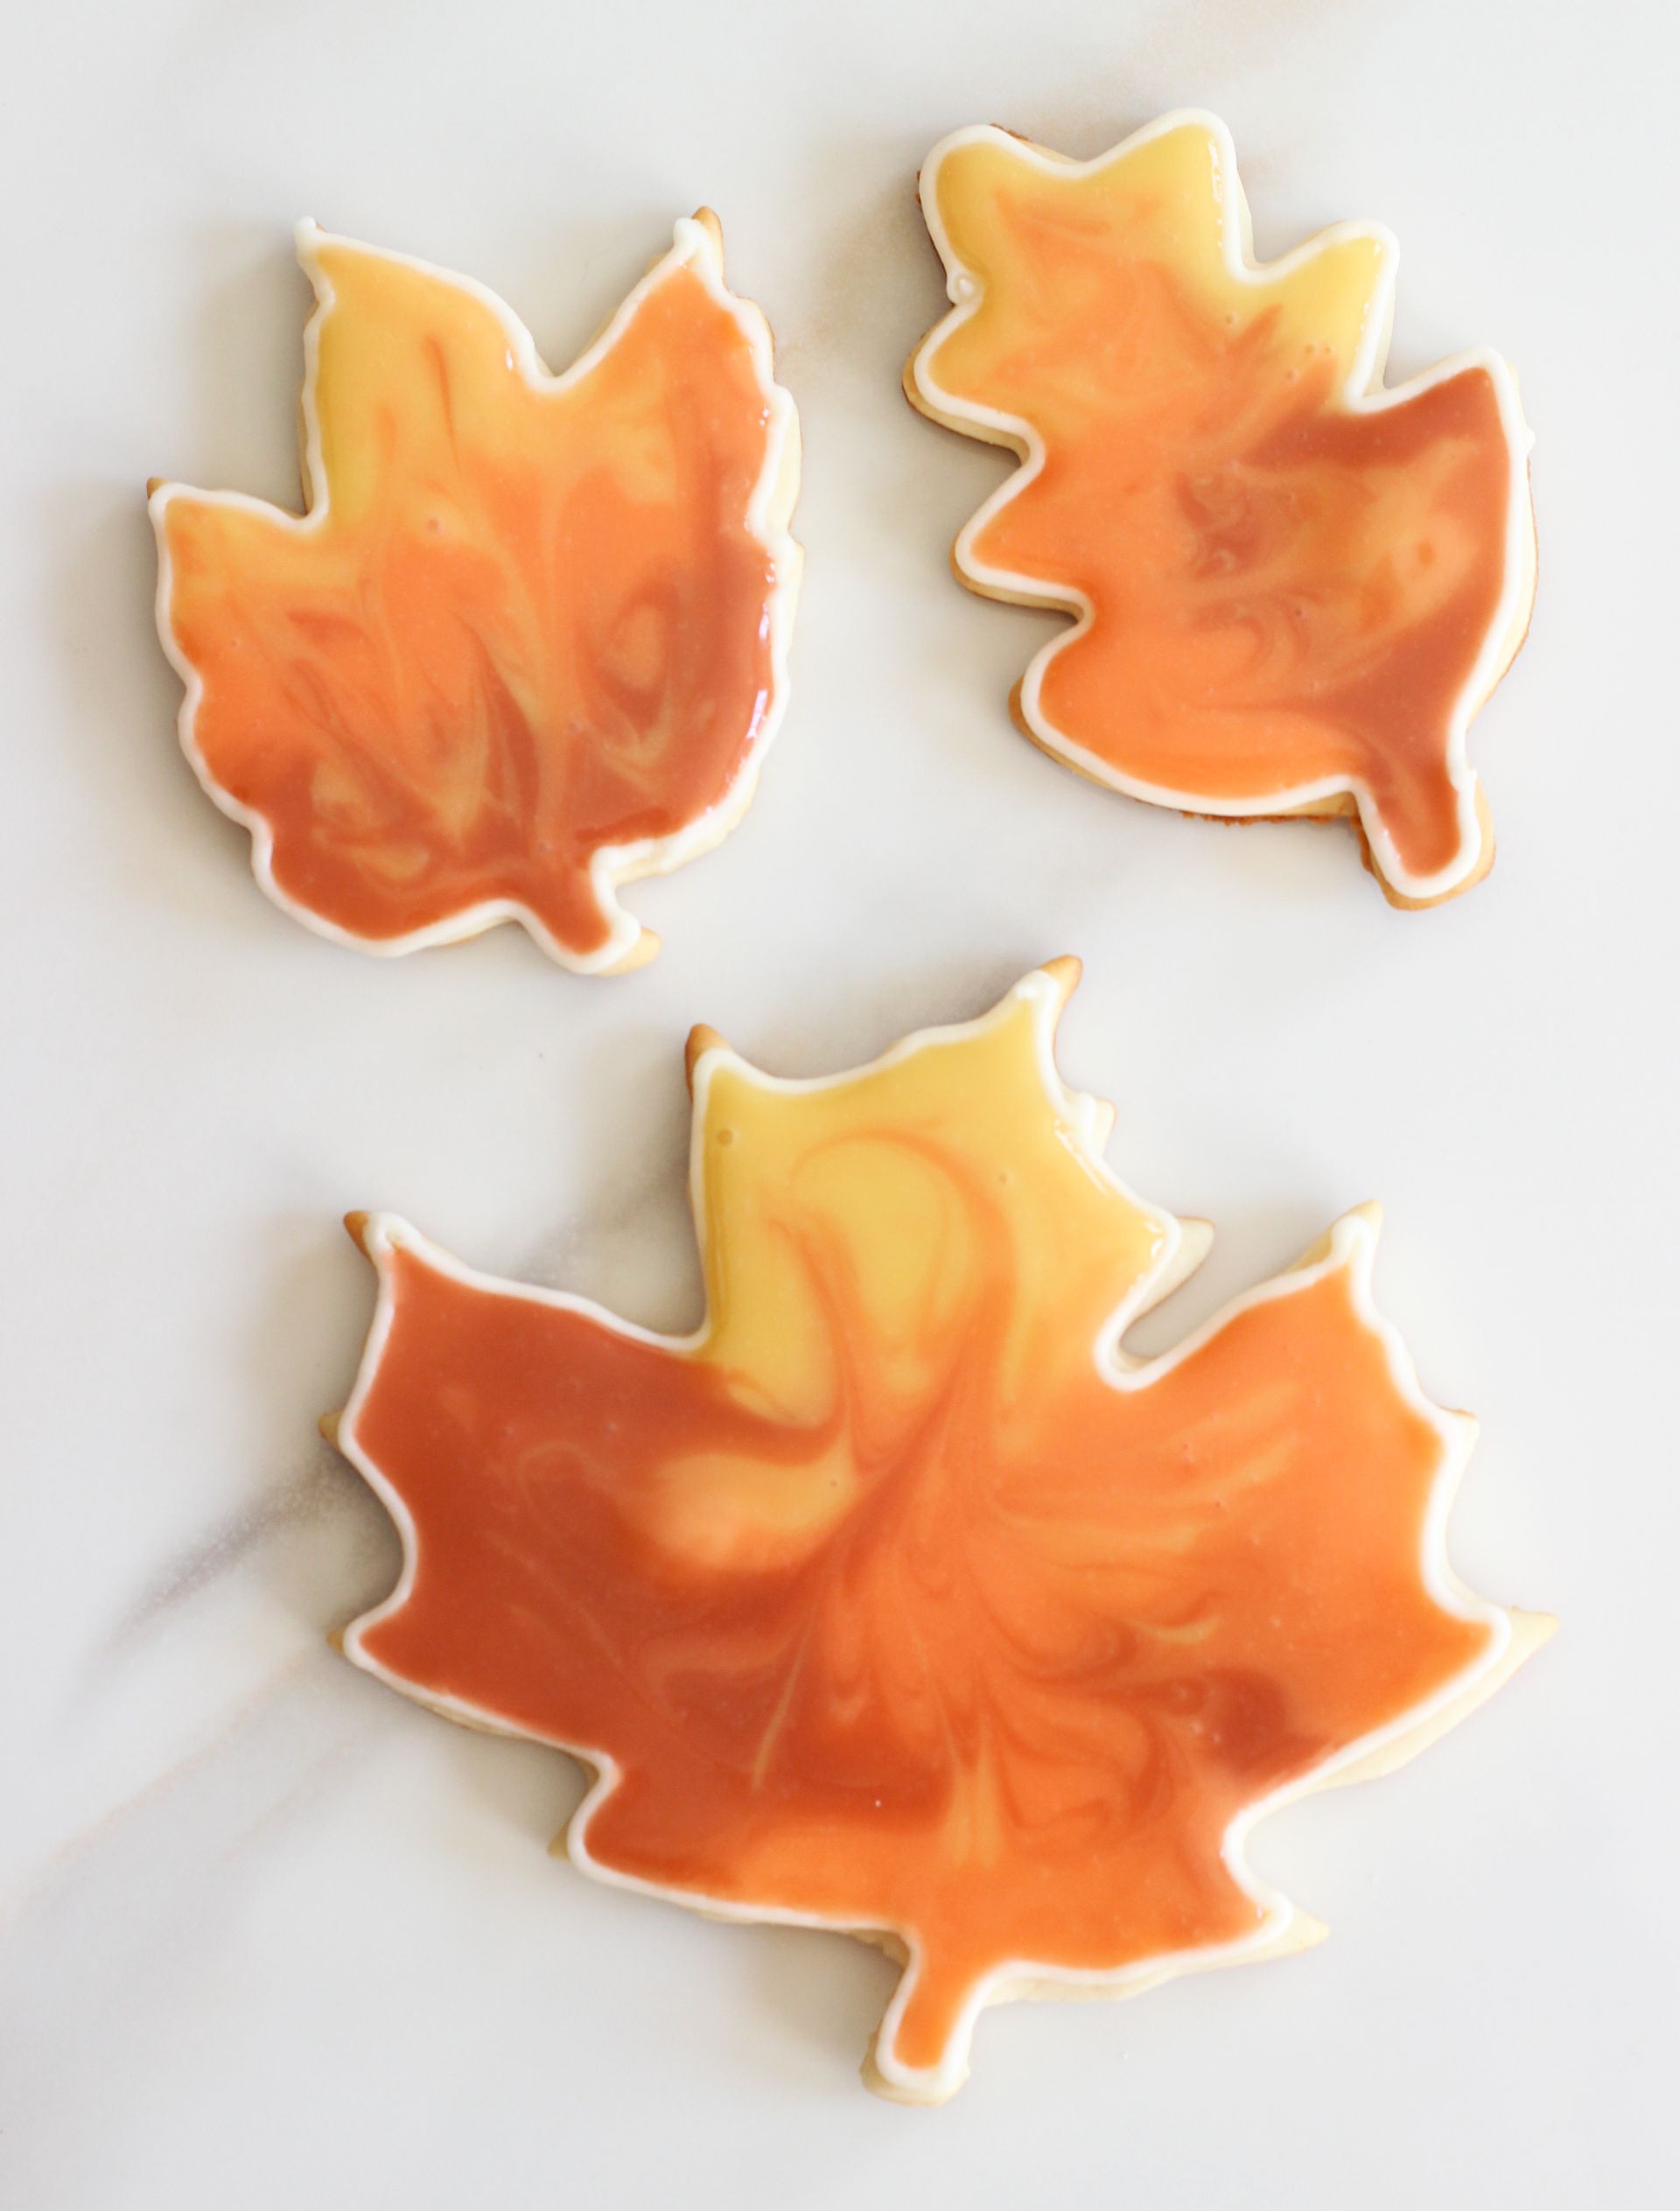
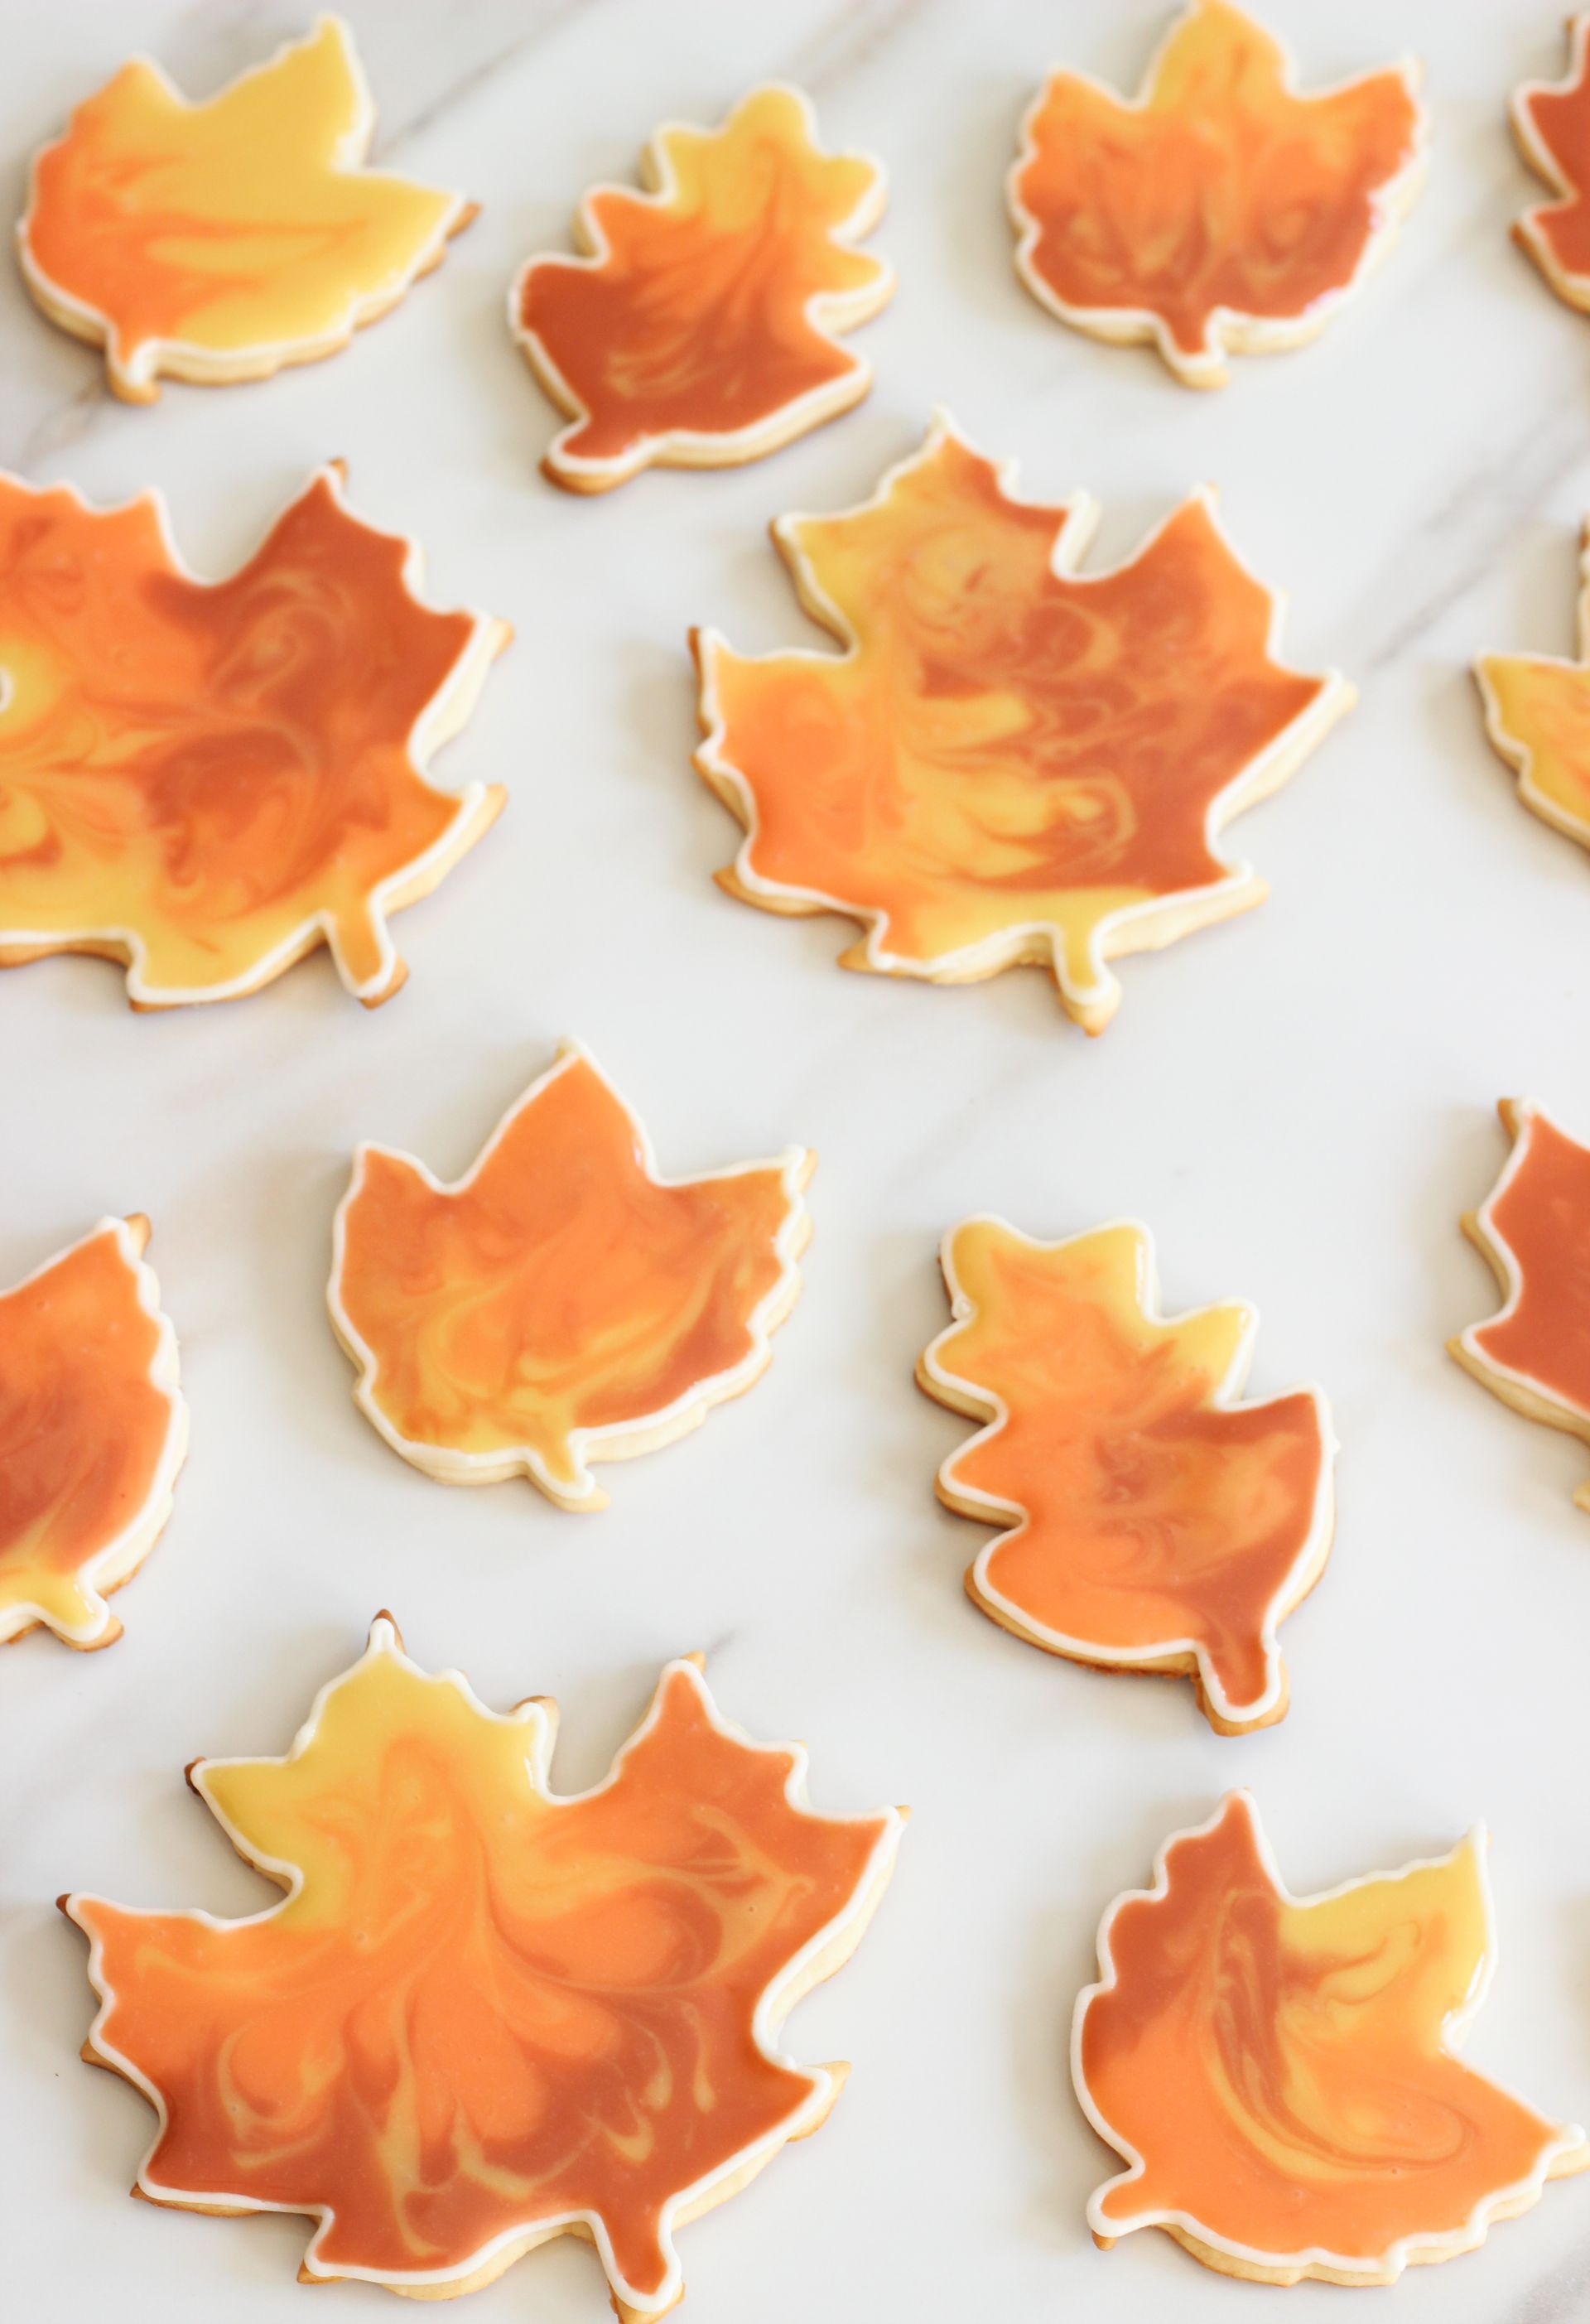
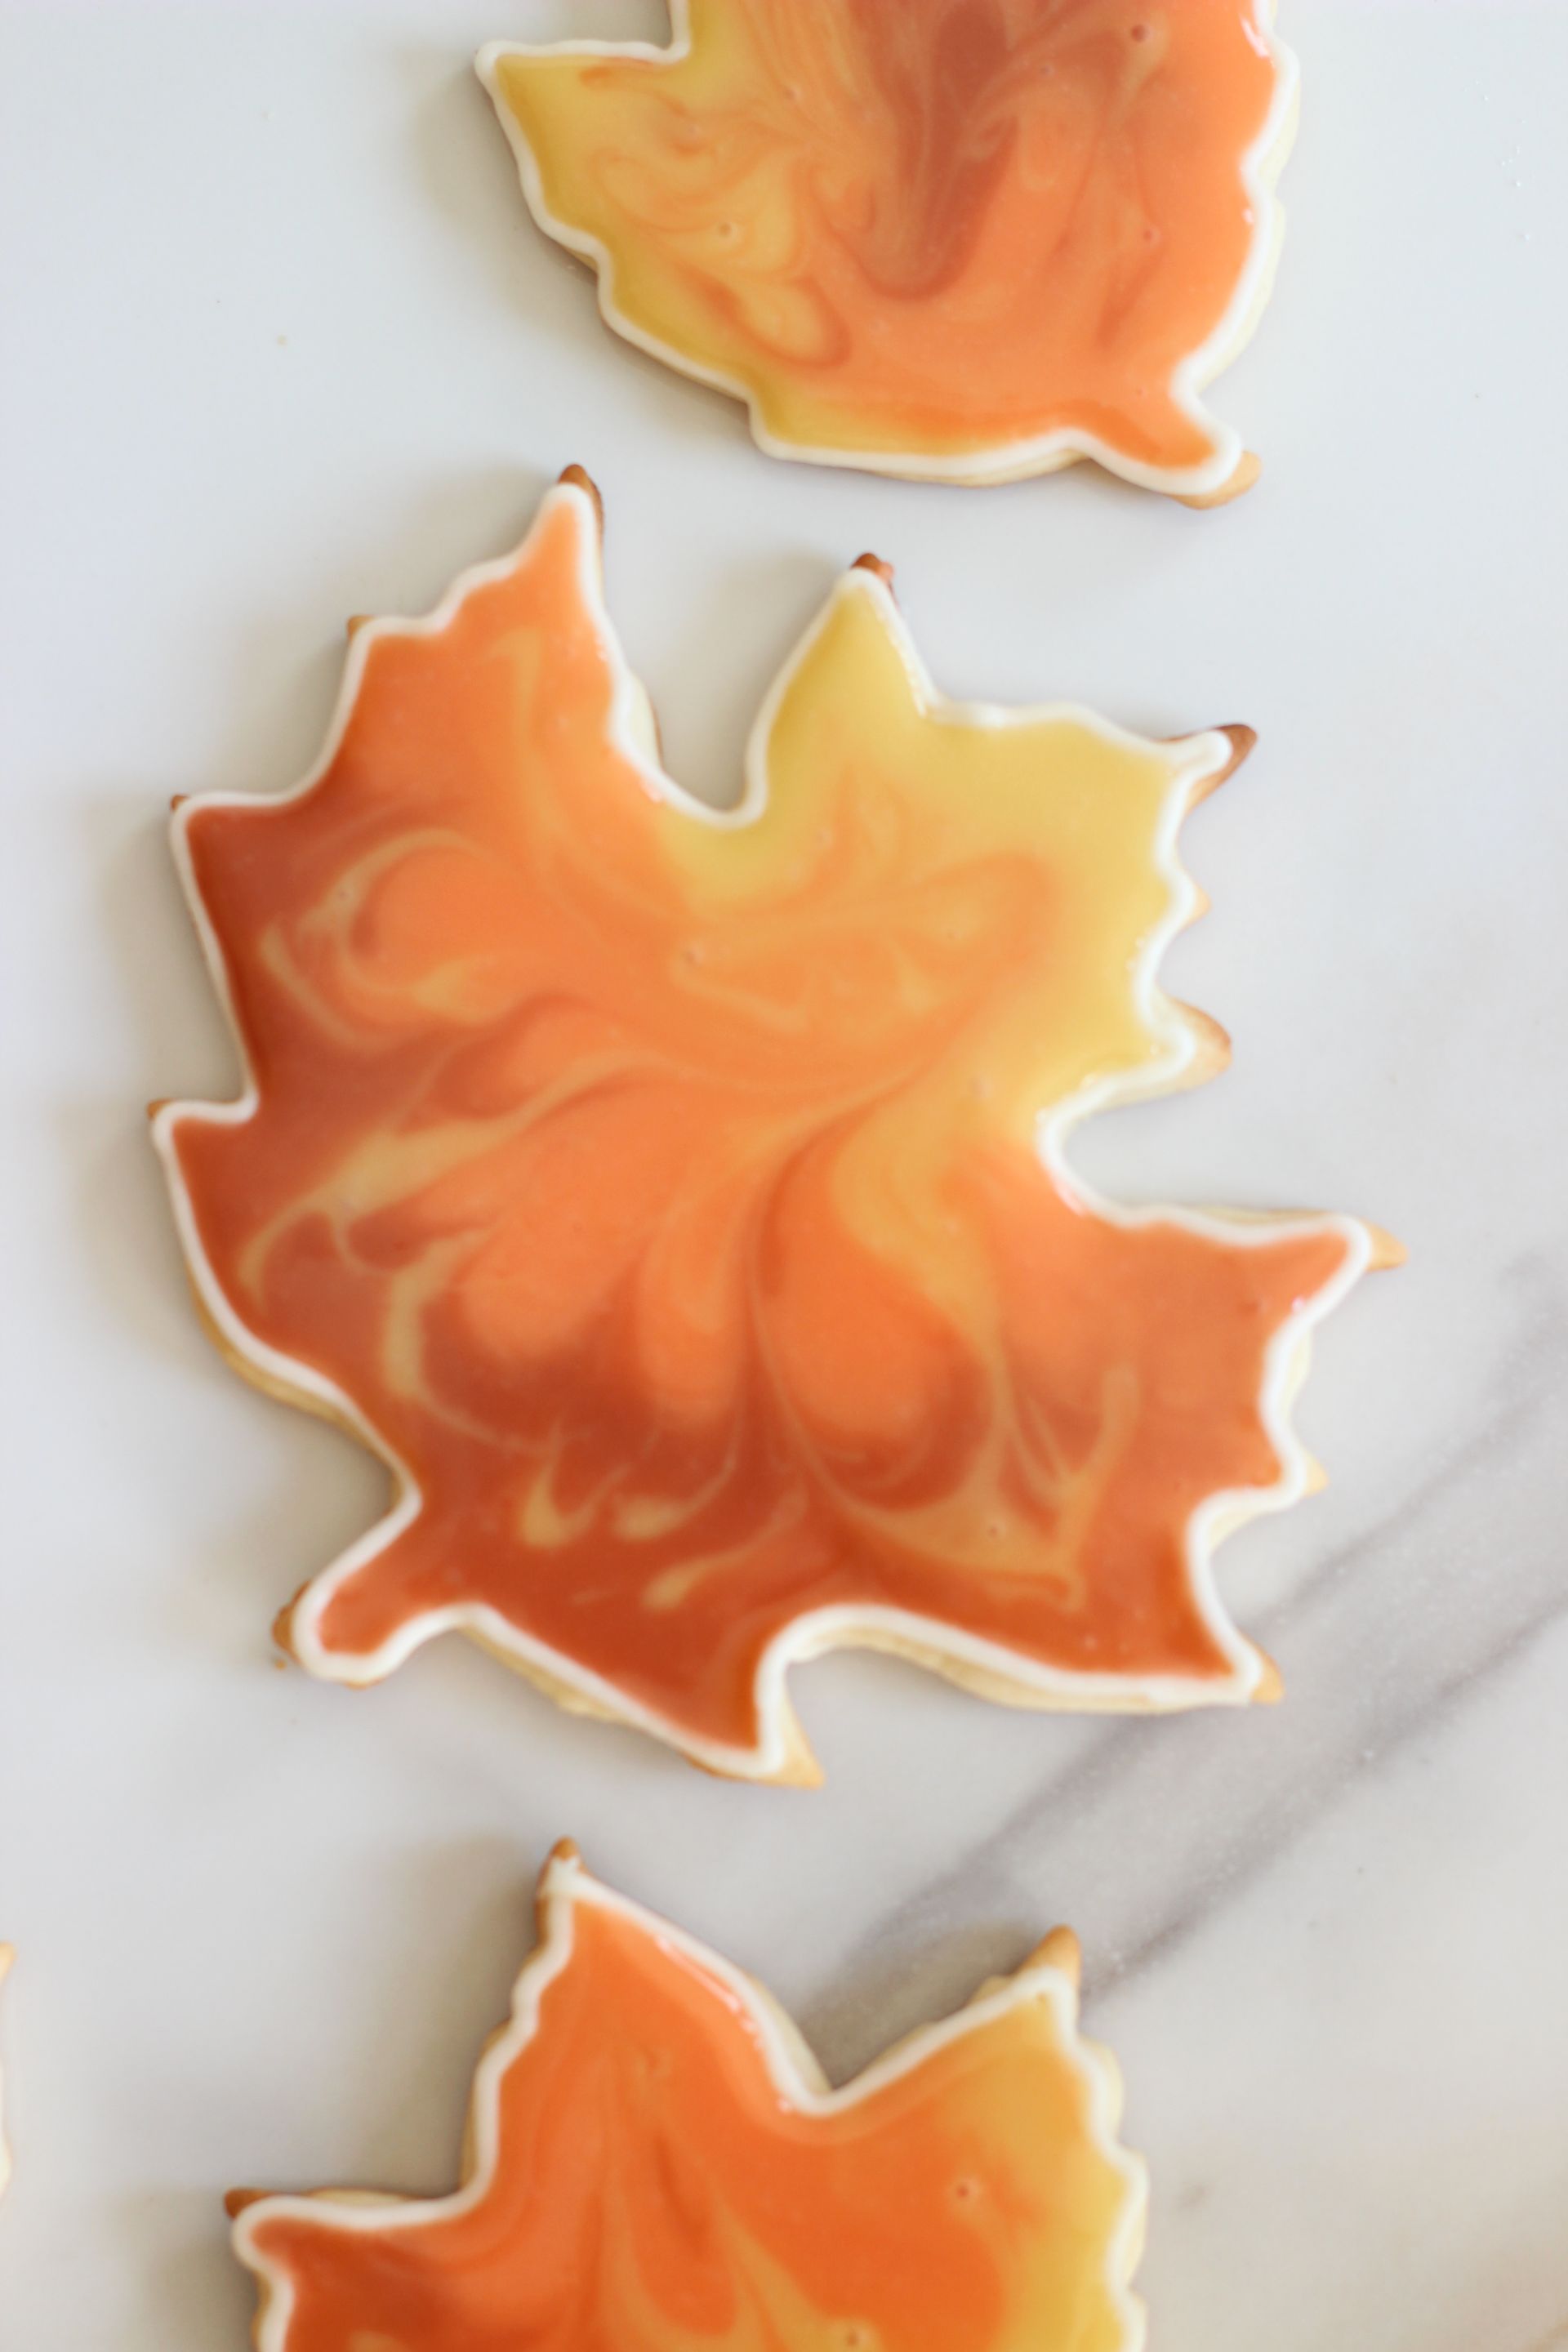
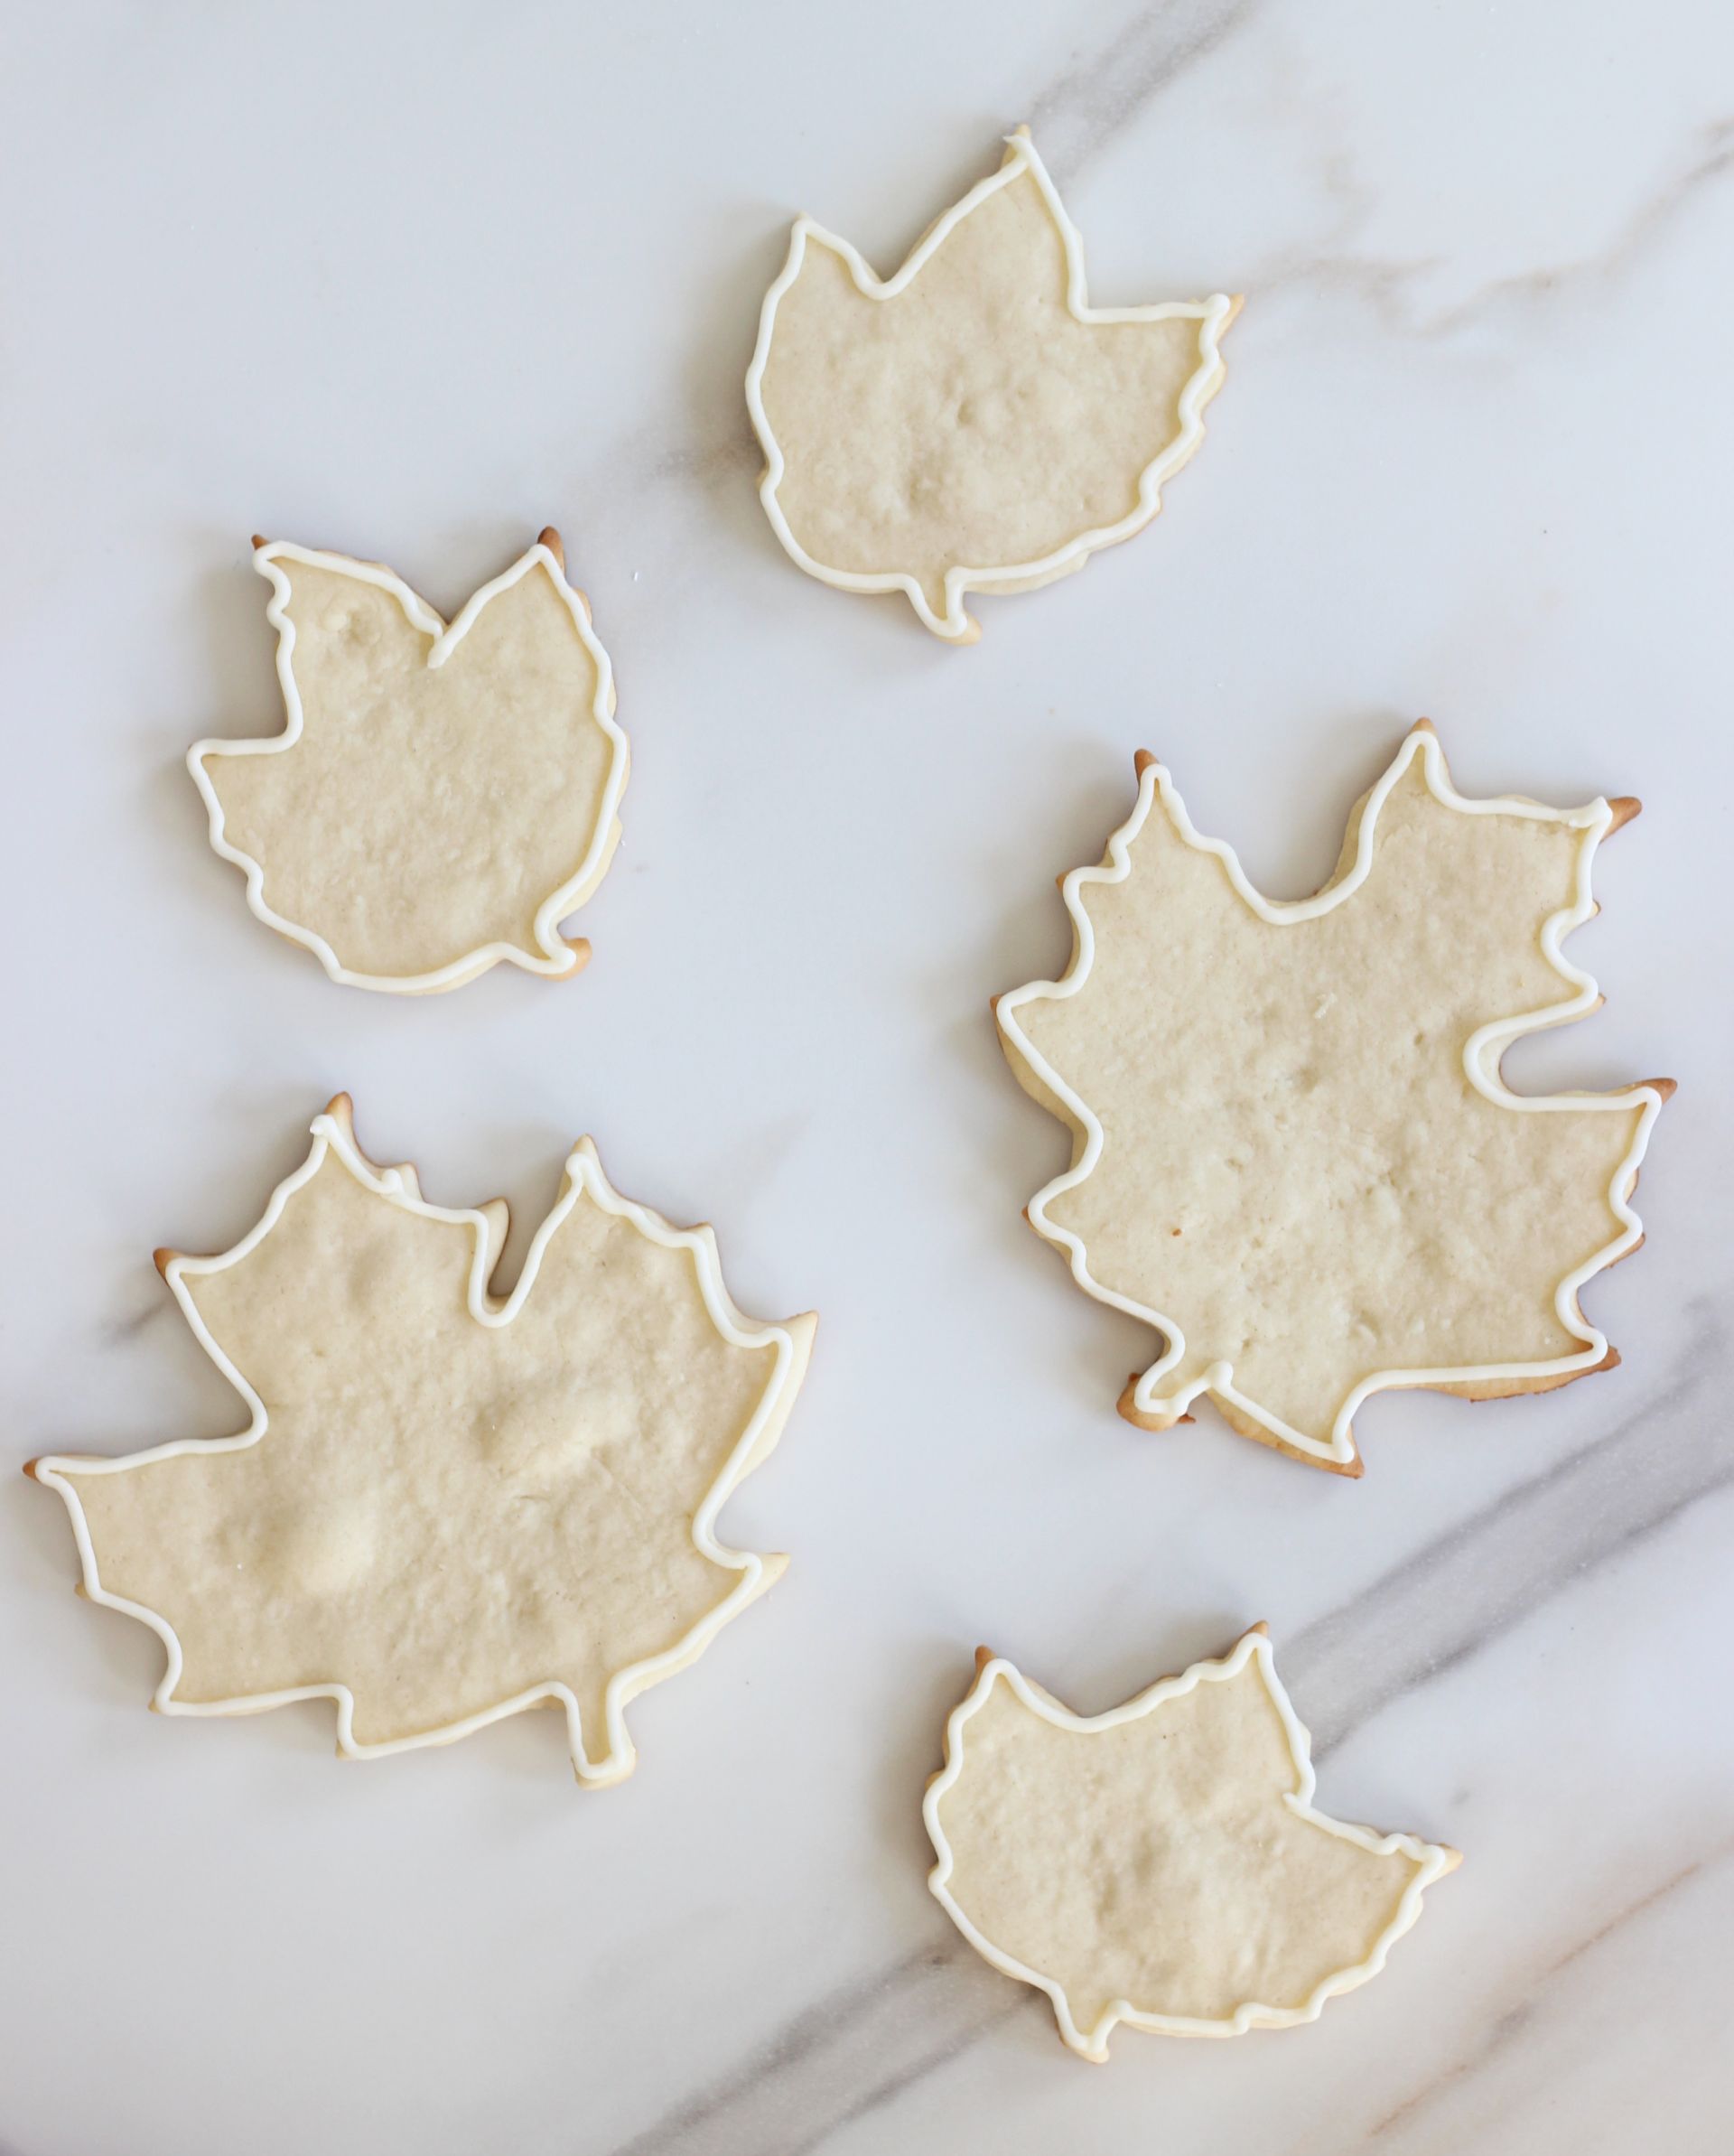
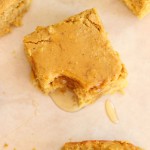
1. Mix up the buttercream frosting, and outline the cookie with it using a piping bag fit with a #3 tip. This serves as a ‘dam.’
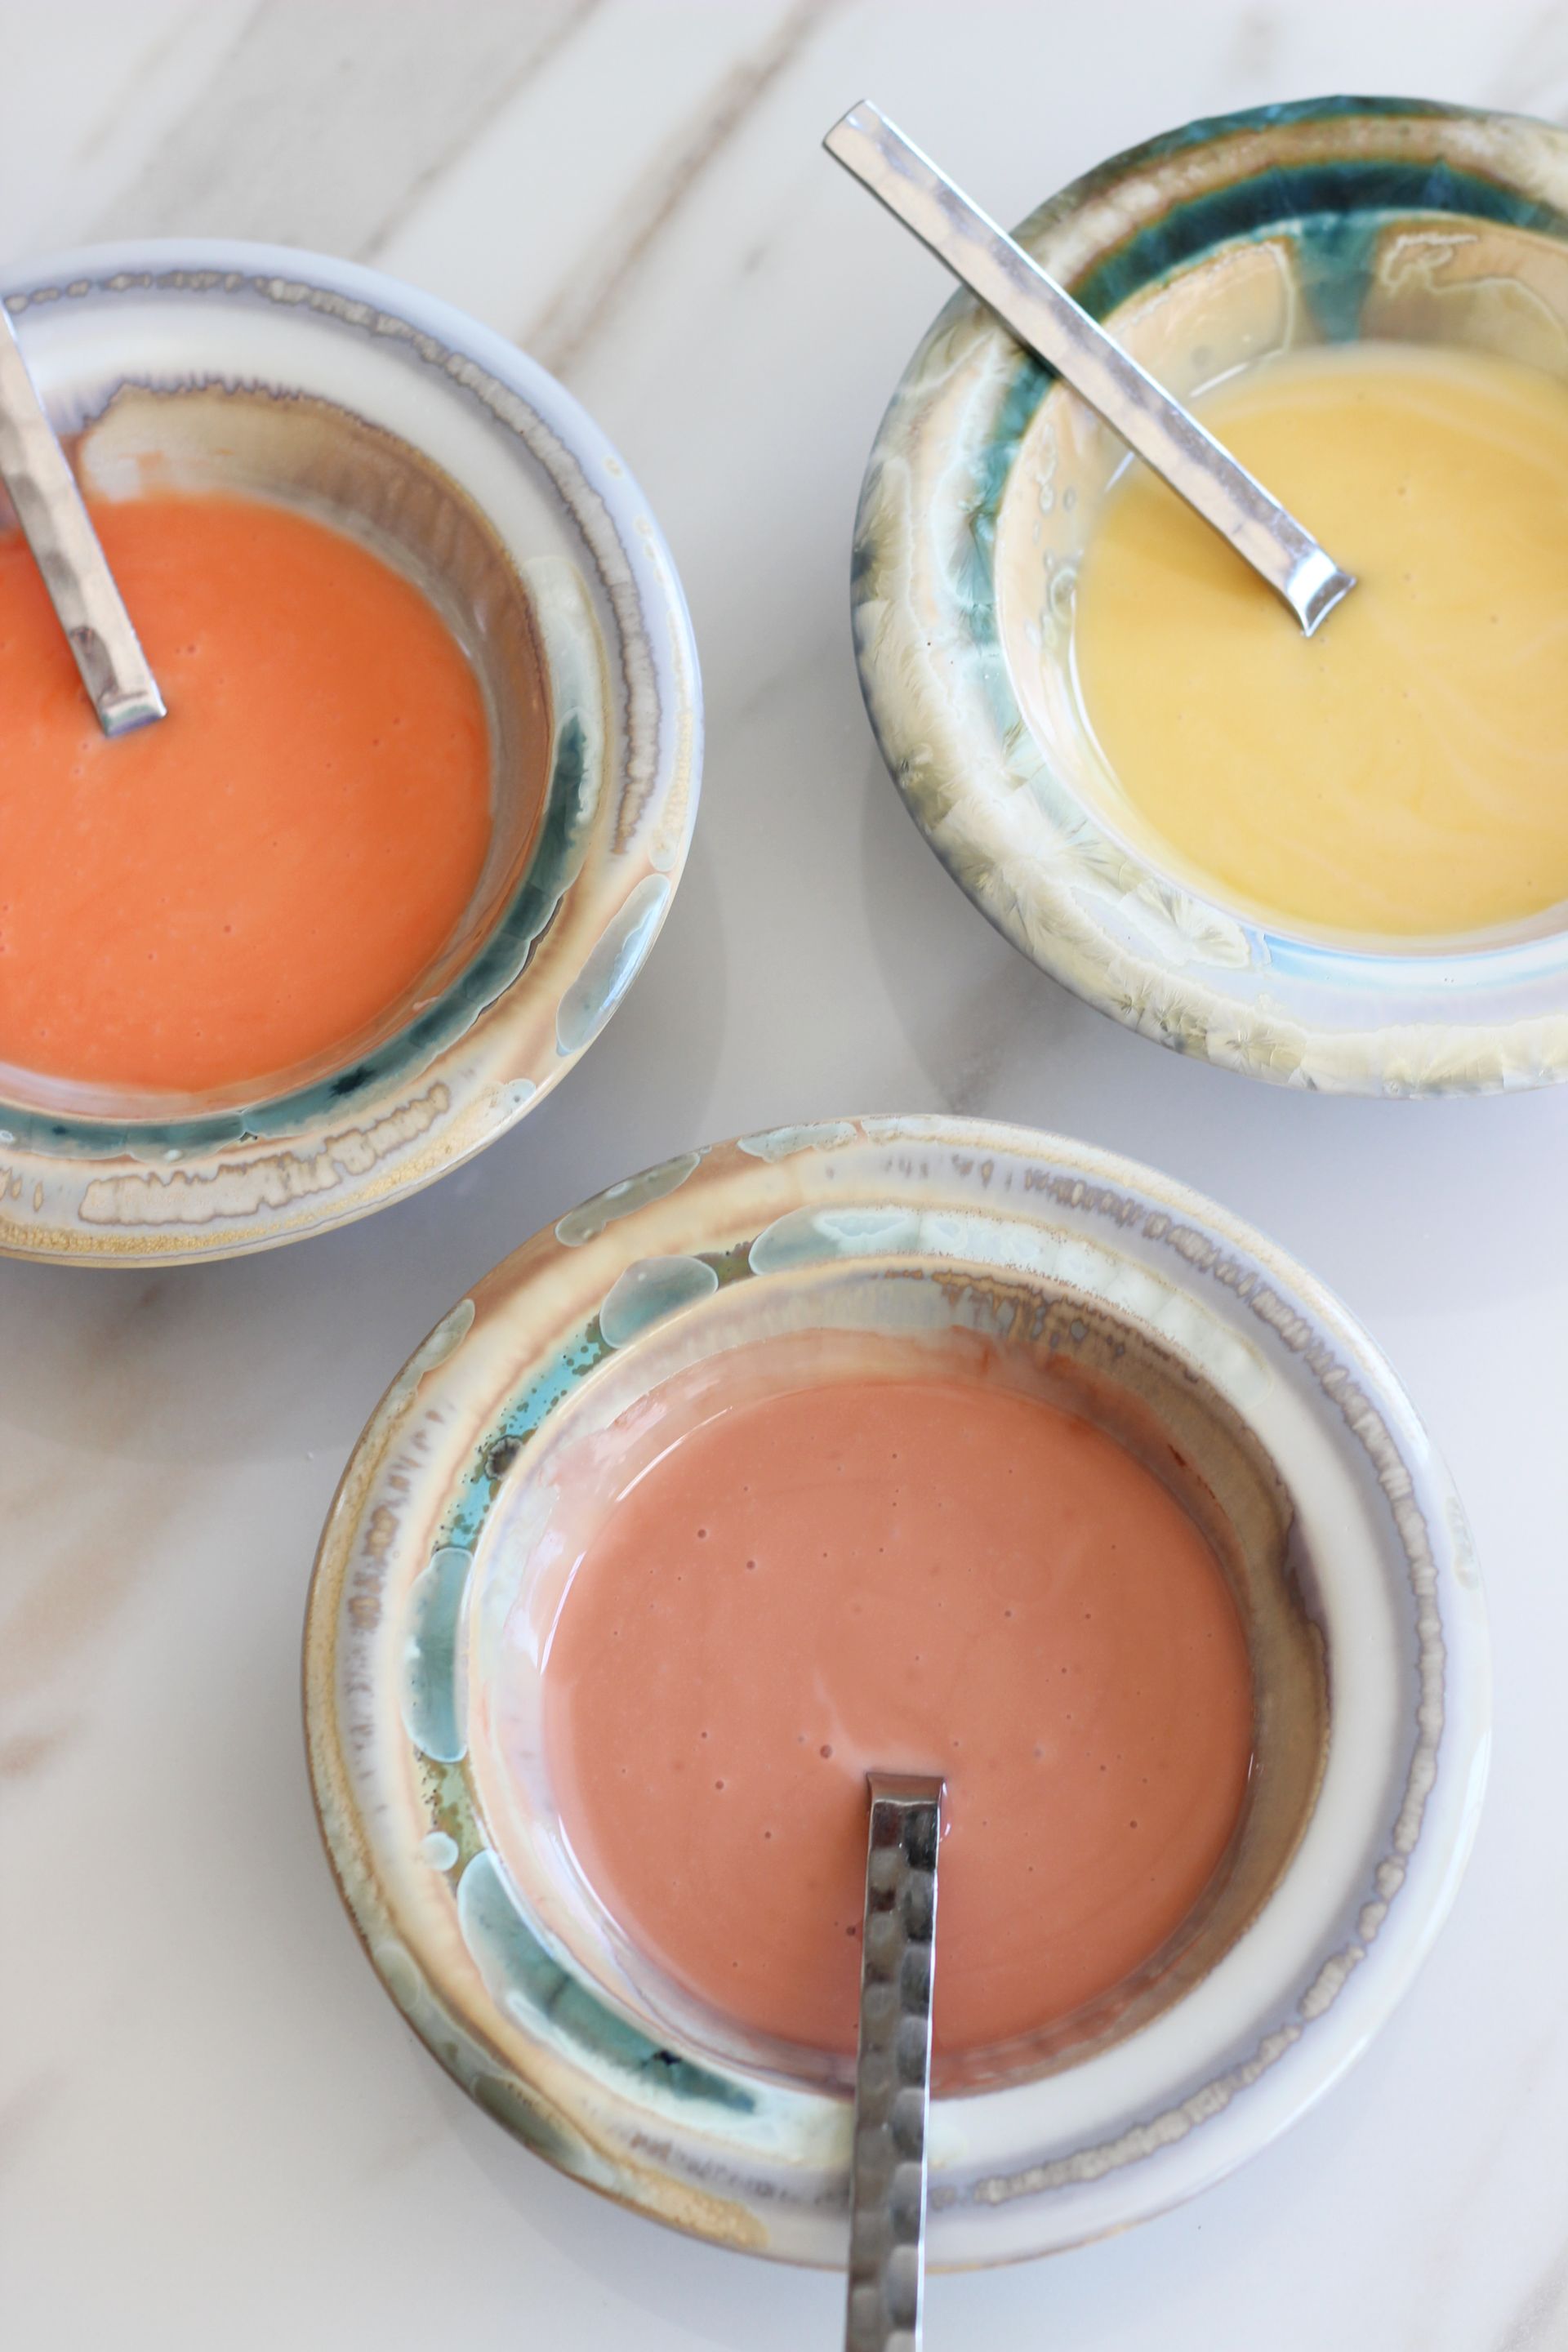
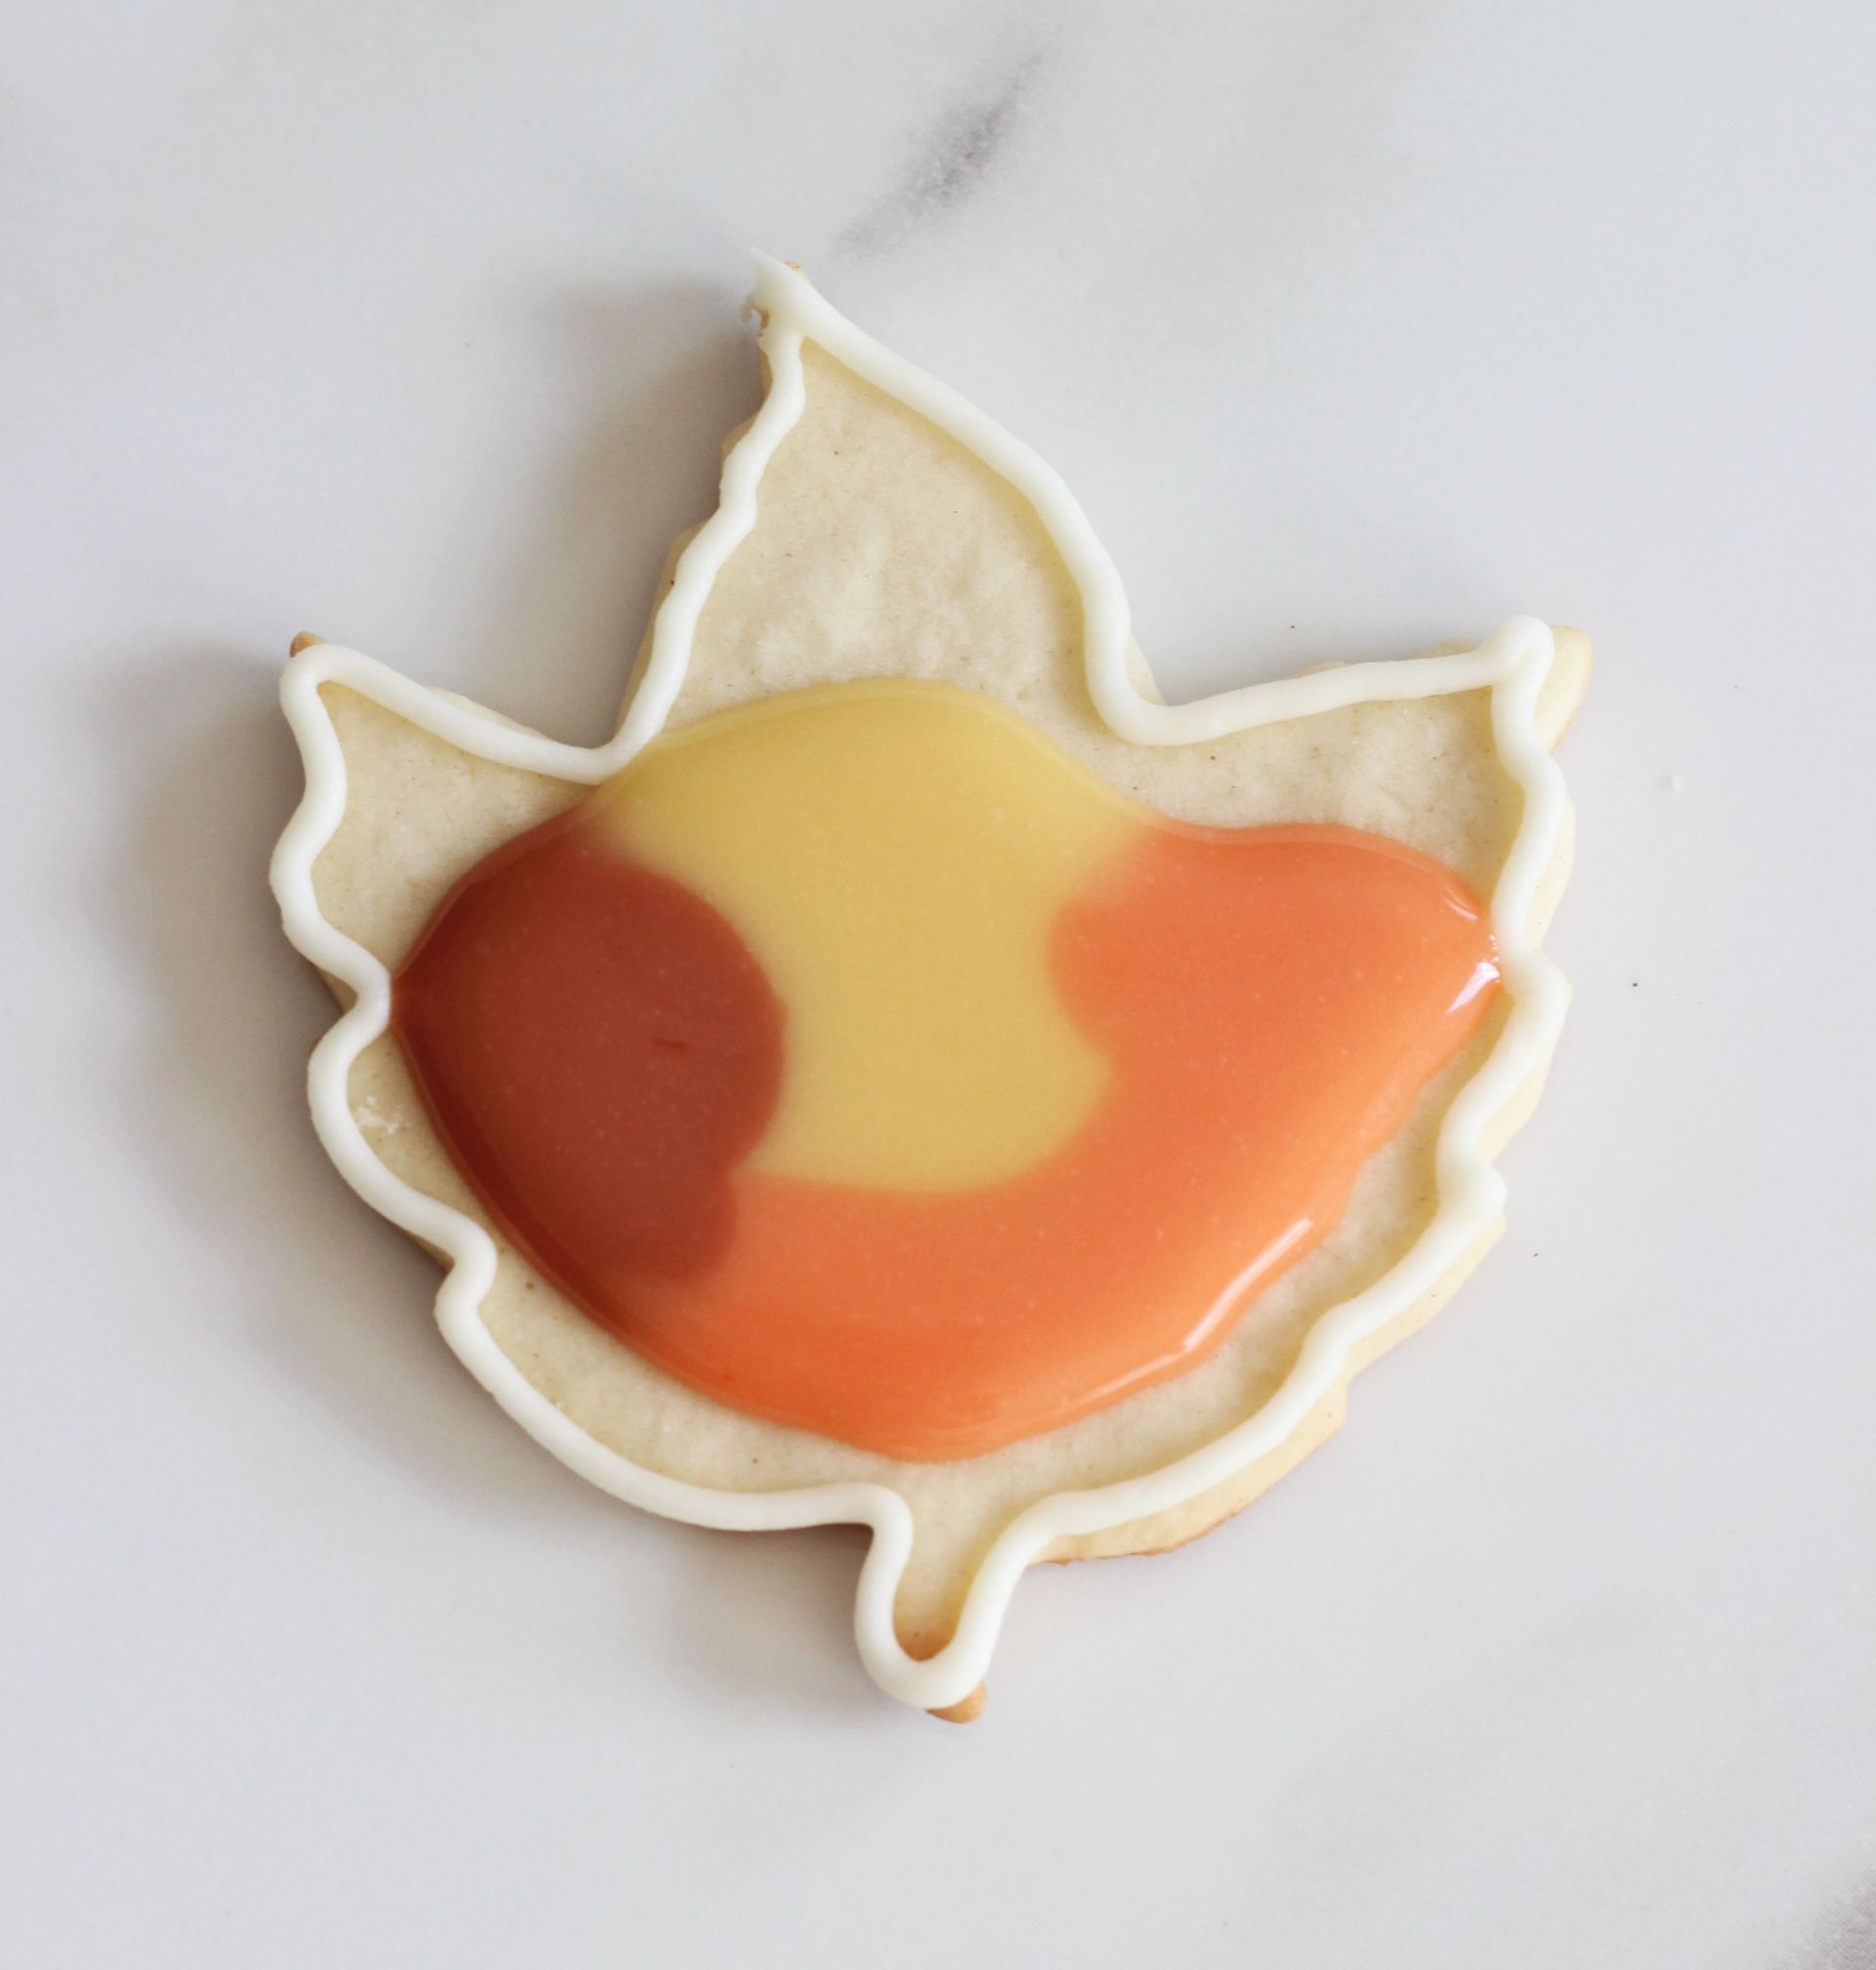
2. Mix up the royal icing and color it however you’d like (I used Americolor gel paste food colors in Copper, Gold, and Warm Brown). Use additional piping bags, squeeze bottles with small openings, or a small spoon to drizzle blobs of each royal icing color onto the outlined cookie. About 1-2 tbsp. total. Avoid too much or it can spillover your ‘dam’. Start with a less is more approach. Swirl with a toothpick to achieve desired patterns. Here’s a few before and afters.
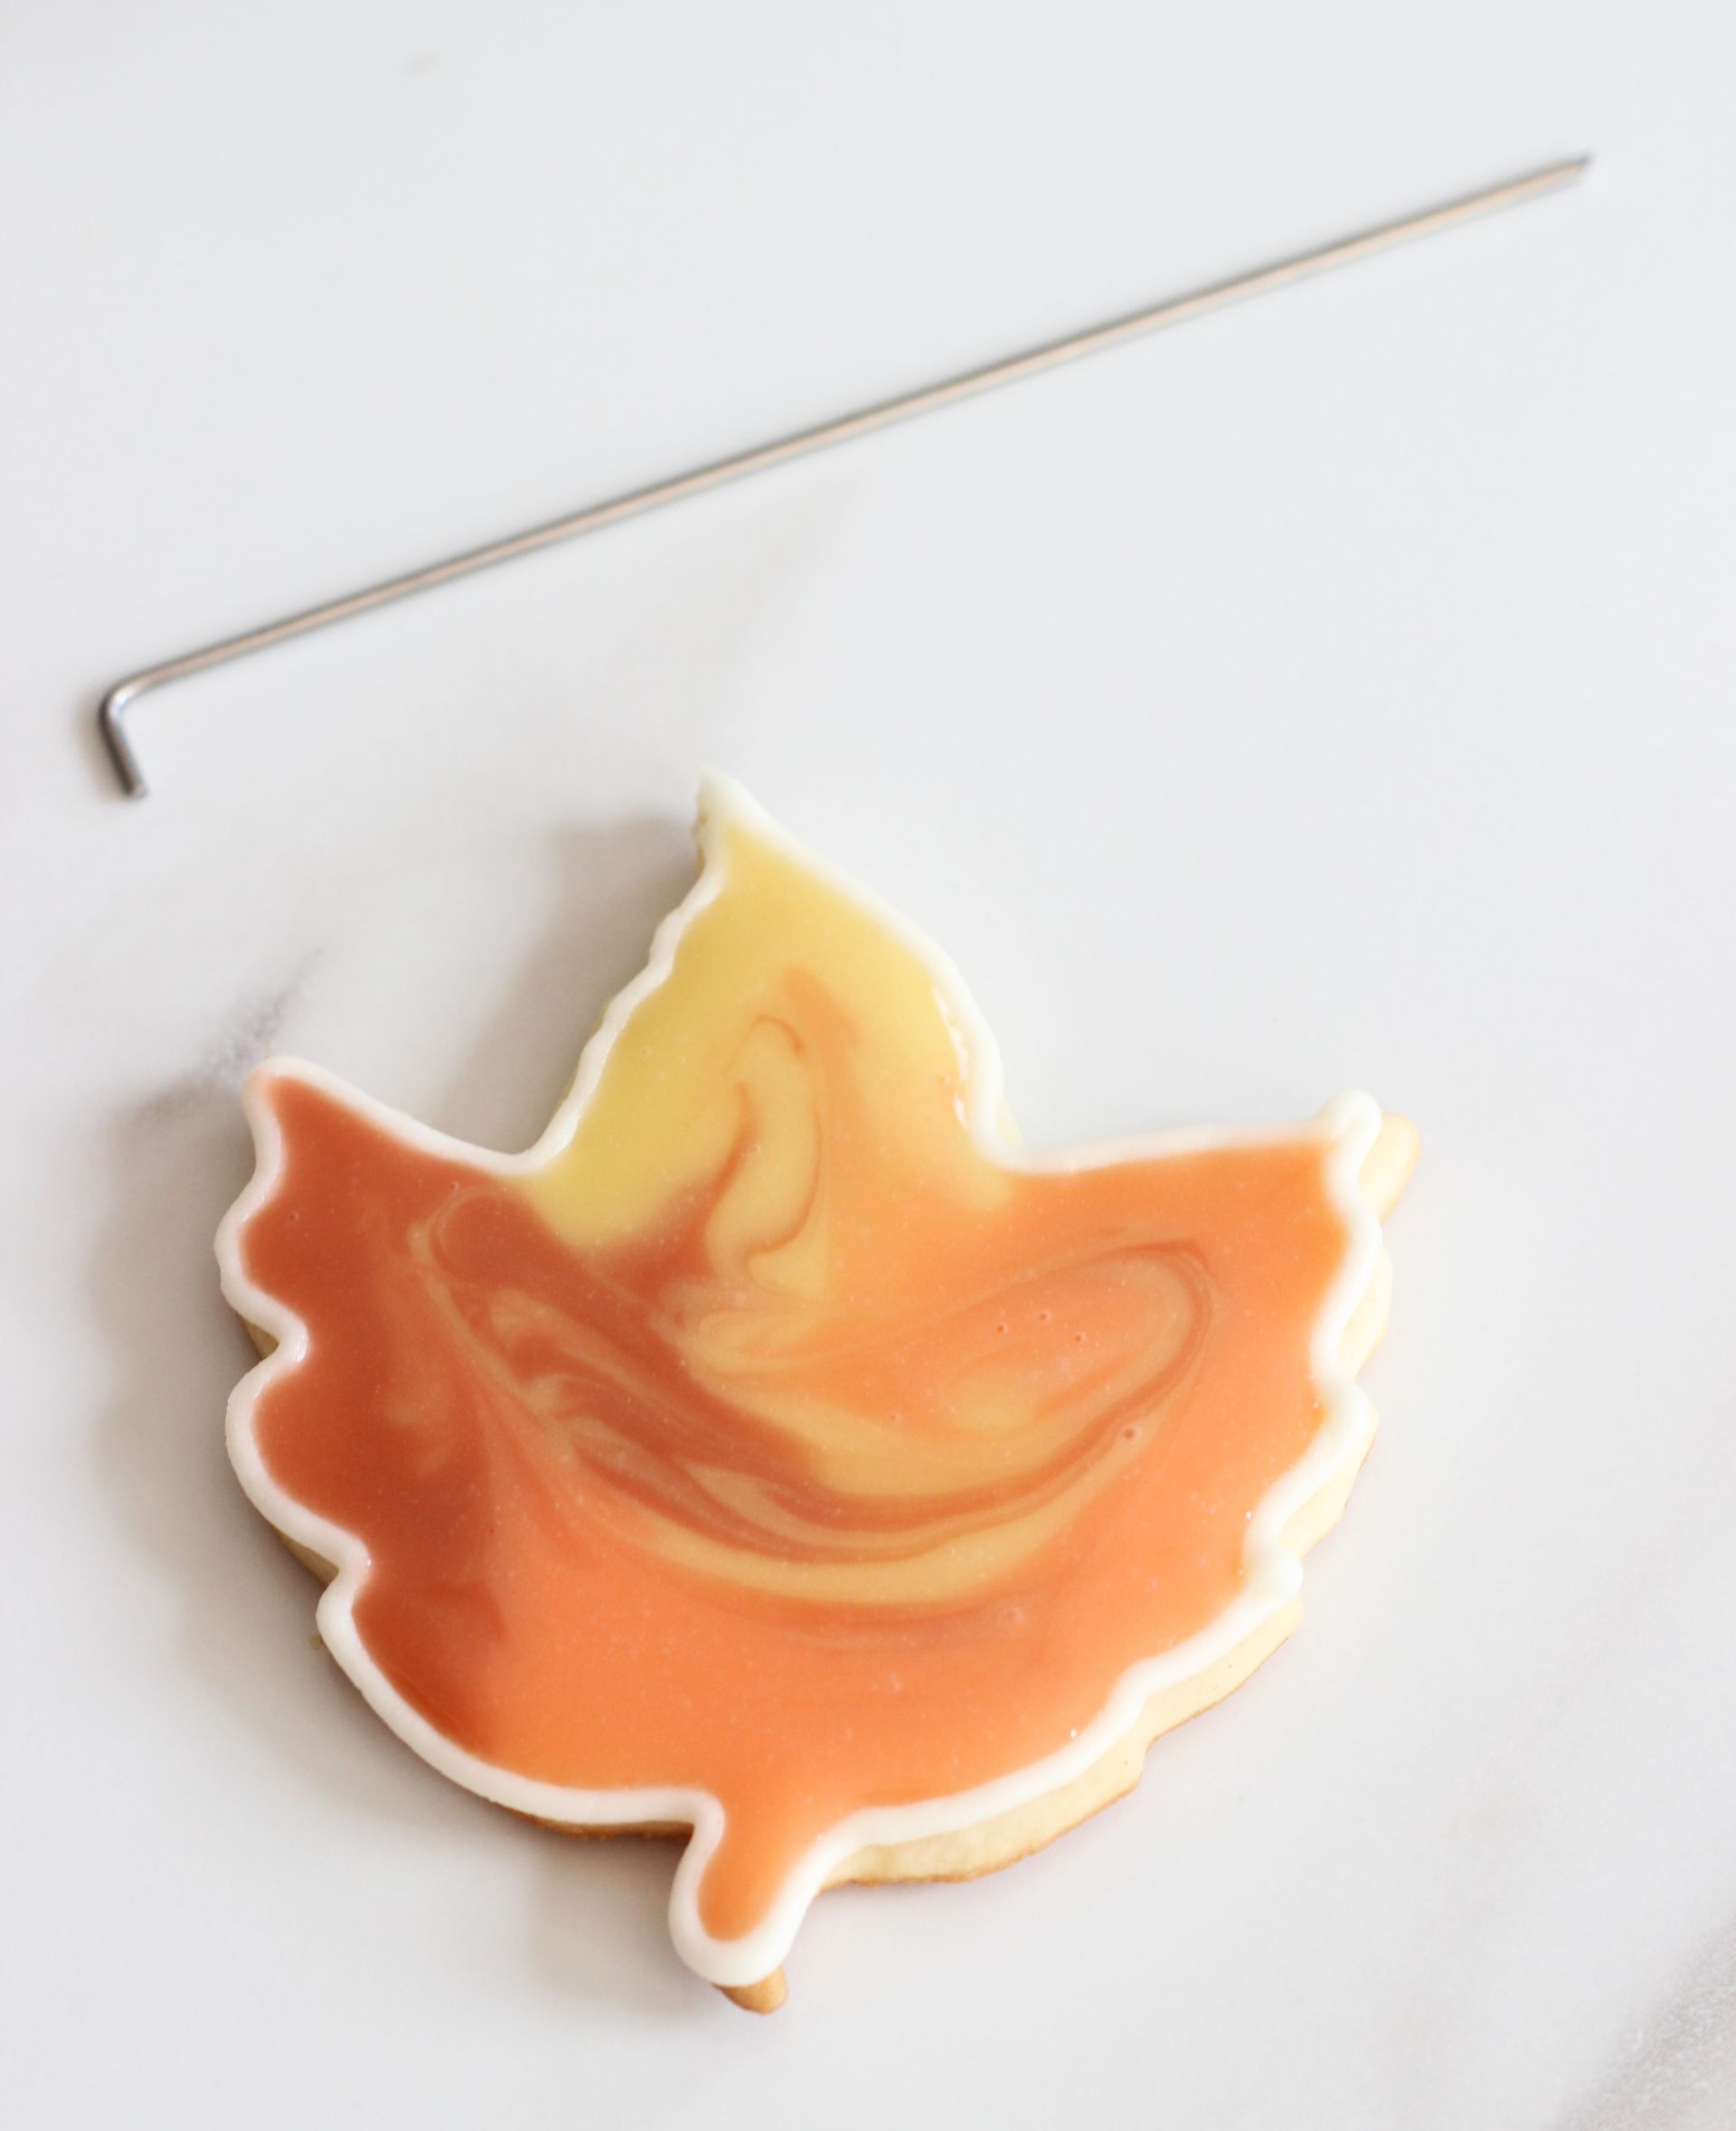
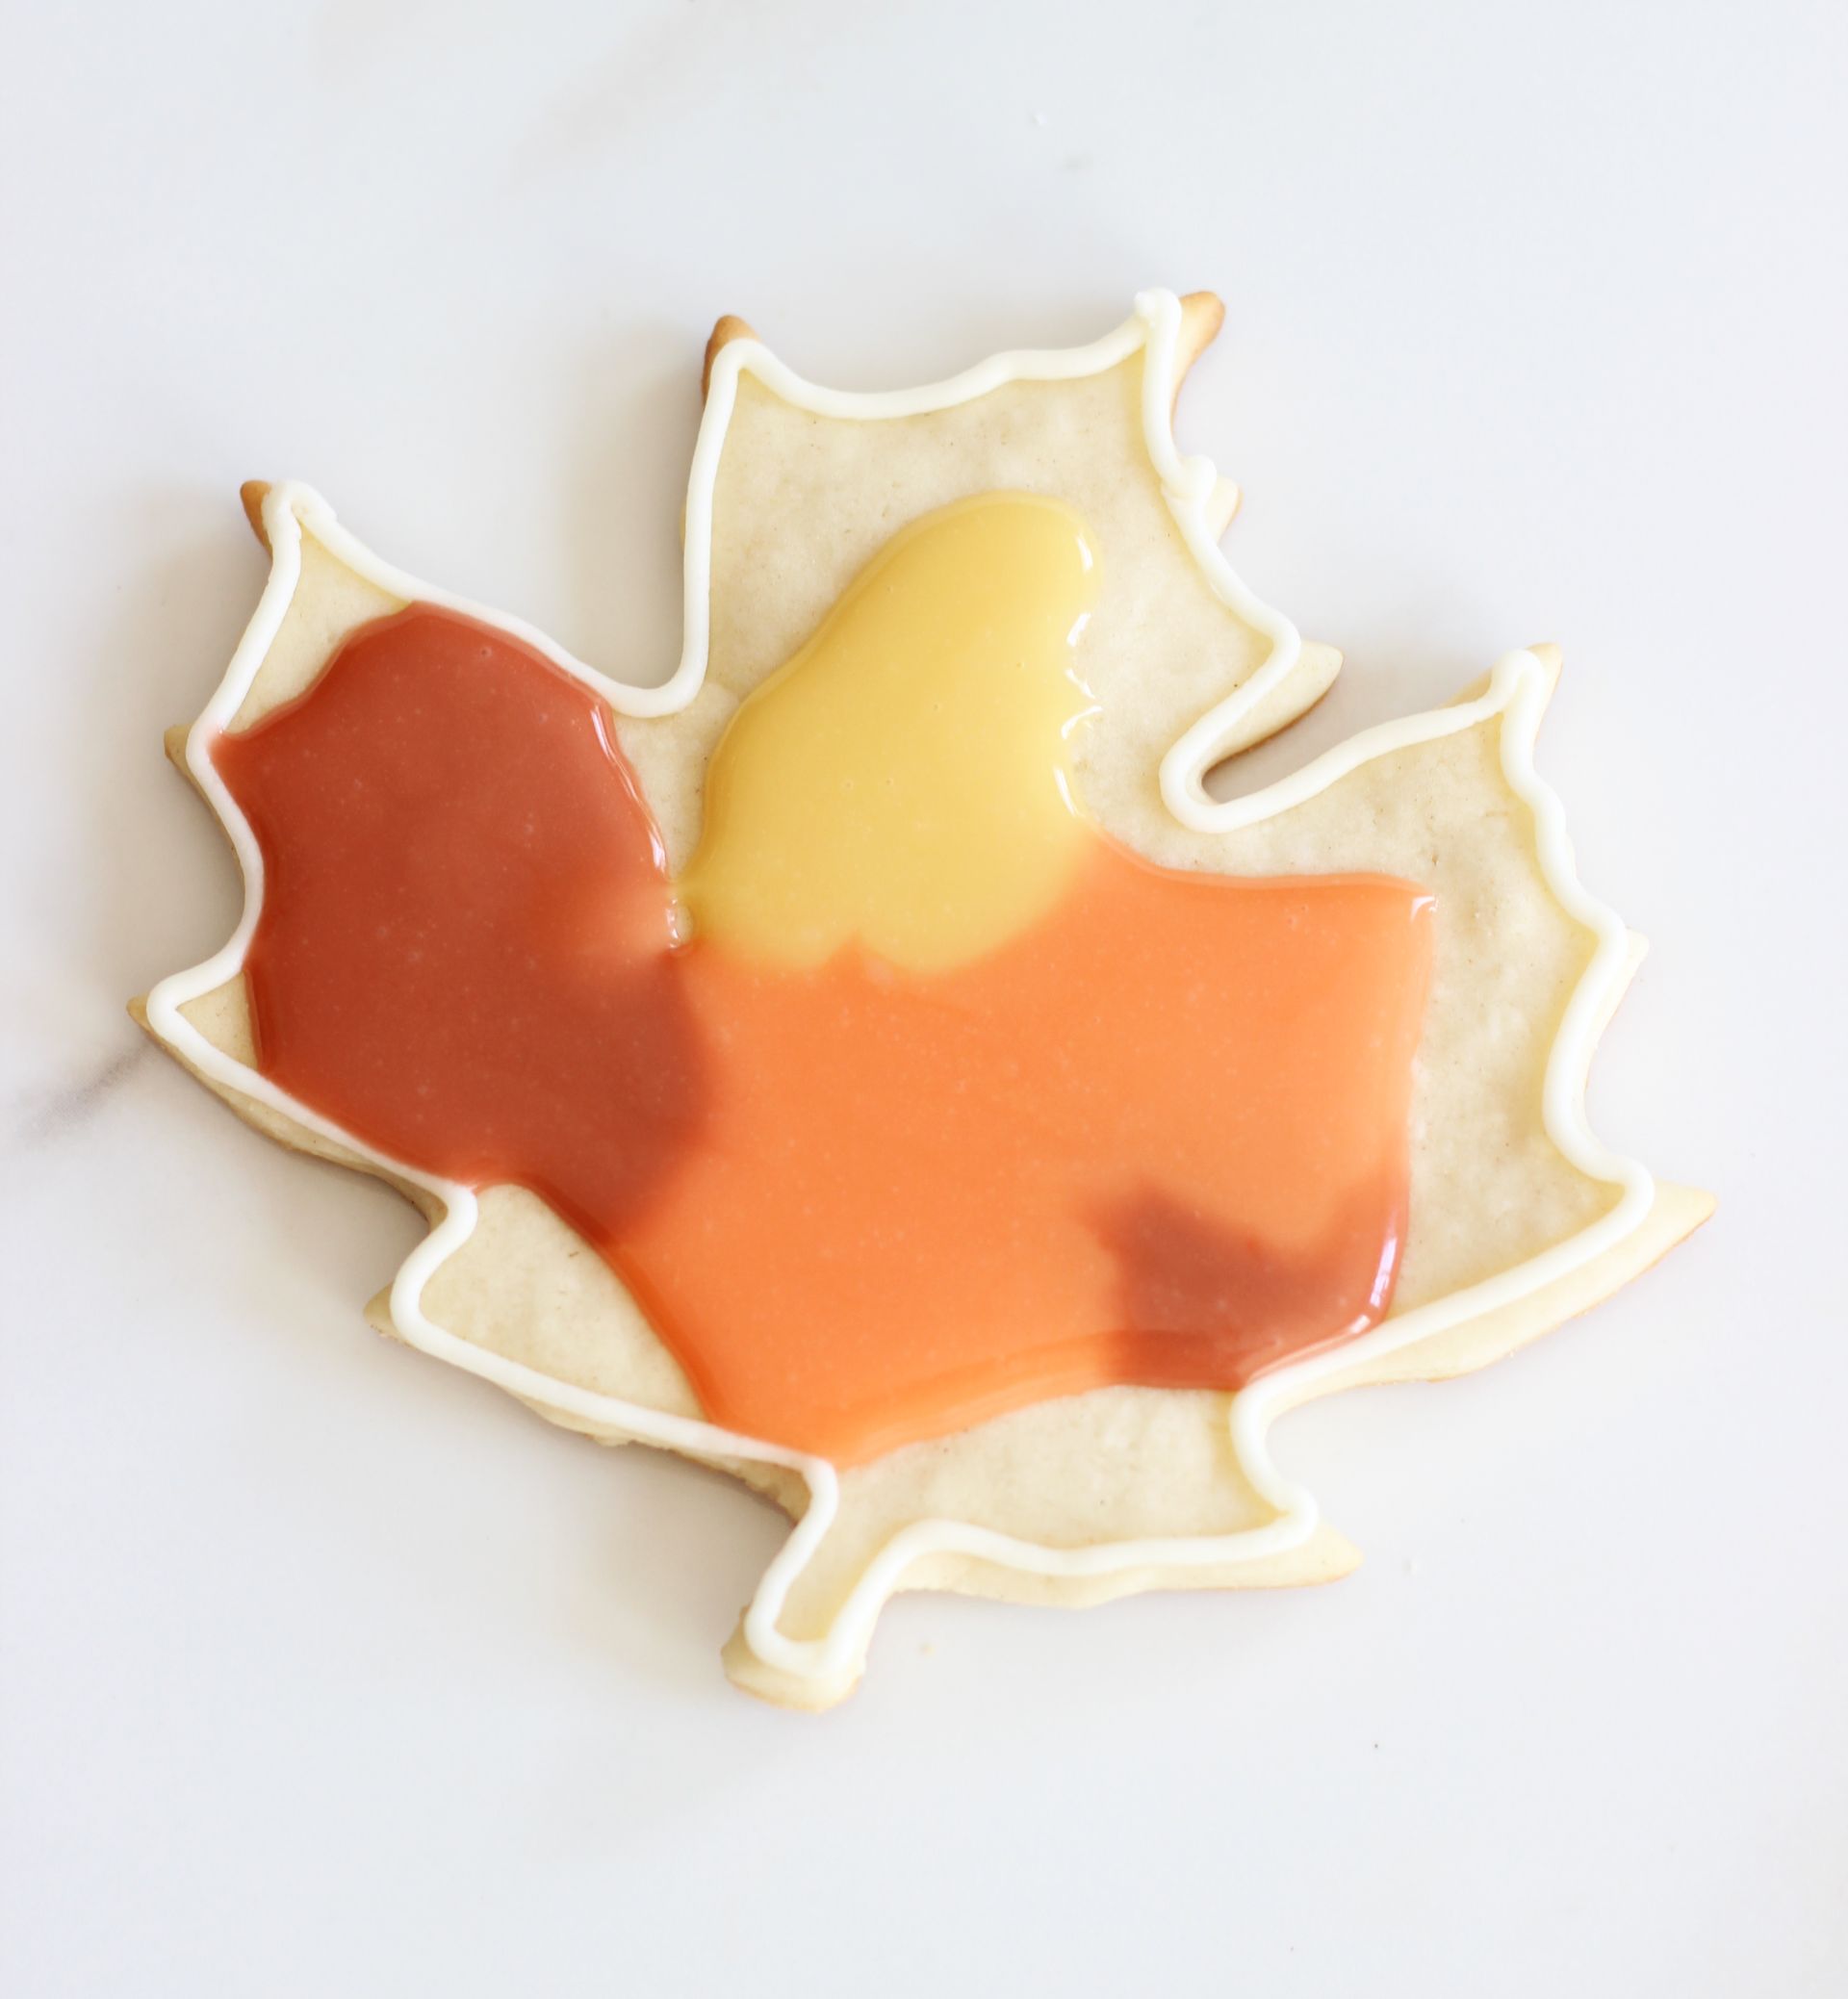
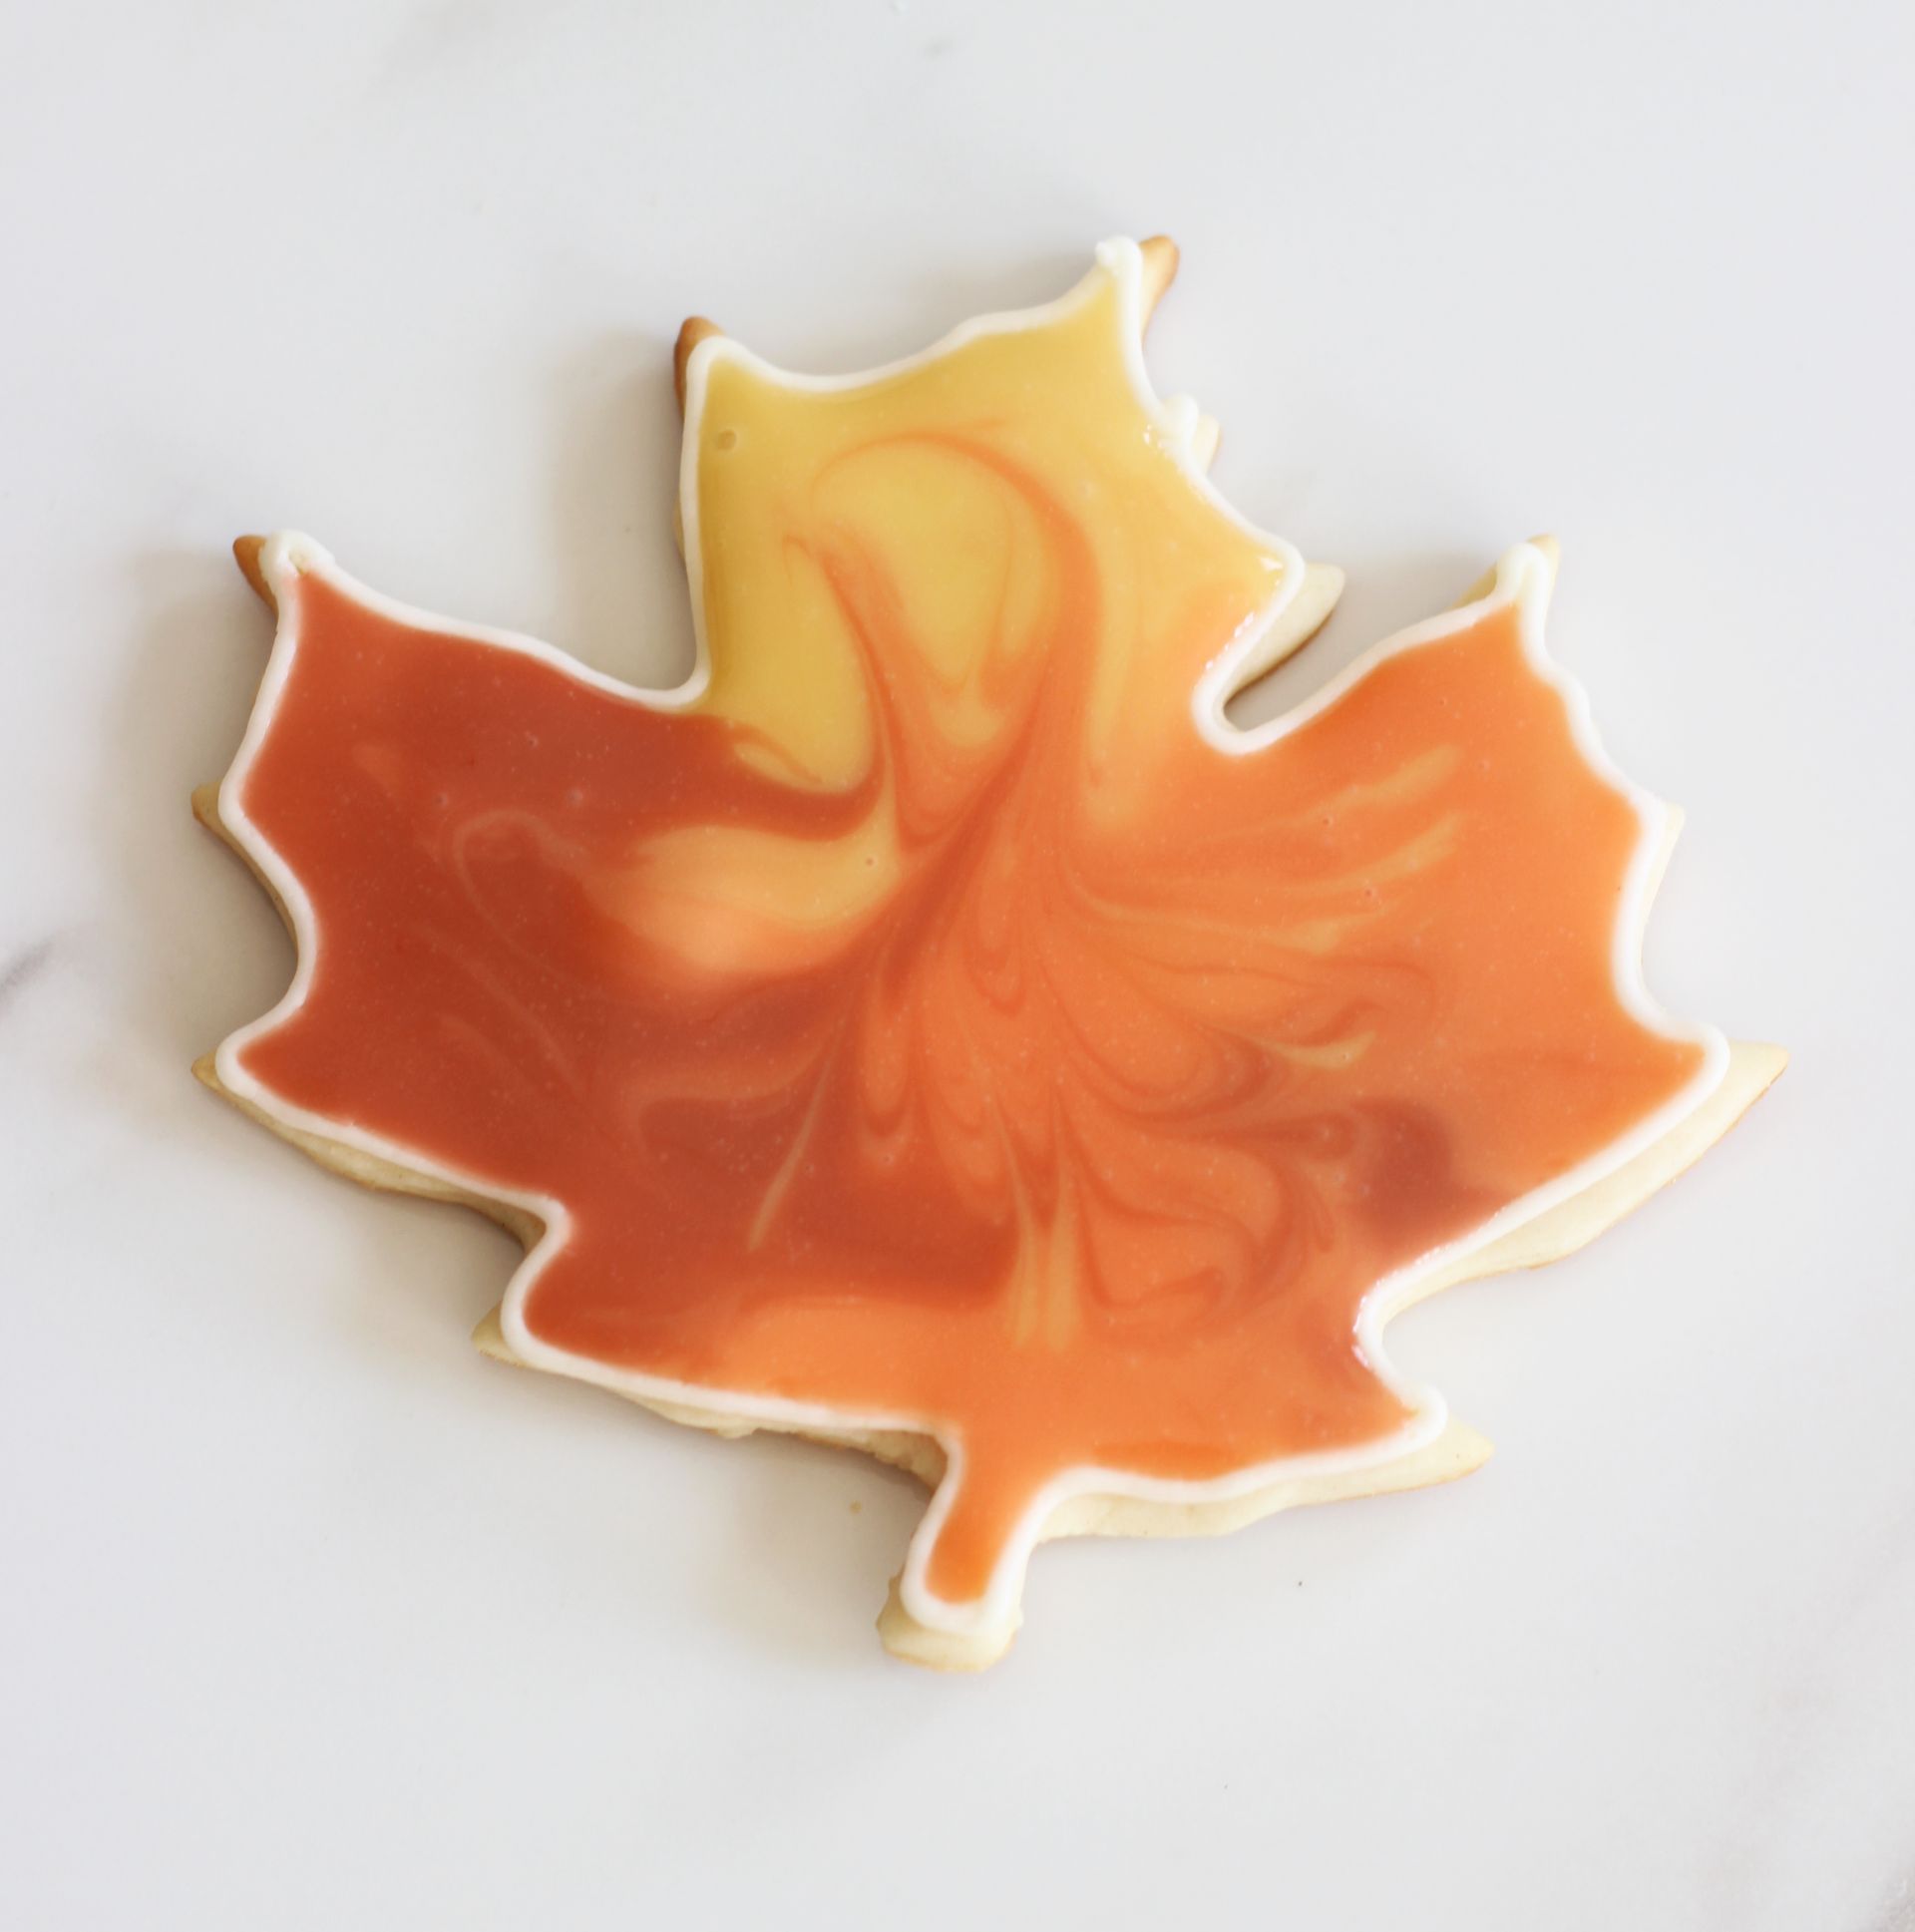
3. Shock the world with your decorating skills. Woohoo!
Cookie Flooding - Sugar Cookie Cutouts
Ingredients
Sugar Cookie Cutouts:
- 1 c. butter softened
- 3/4 c. sugar
- 1 egg
- 1 tsp. vanilla
- 2 1/2 c. flour plus more for rolling
- 1/2 tsp. baking powder
- 1/4 tsp. salt
Buttercream frosting:
- 6 tbsp. butter softened
- 2-3 tbsp. water
- 3 c. powdered sugar approximately
Royal icing:
- 1/3 c. water
- 1/3 c. corn syrup
- 1 lb. powdered sugar
- food coloring
Instructions
For cutout cookies:
- In a large mixing bowl, cream sugar and butter.
- Add in egg and vanilla, and mix until incorporated.
- In a medium bowl, combine flour, baking powder, and salt.
- Mix into sugar mixture until well-combined.
- Chill dough for 1-2 hours.
- On a generously floured surface, roll out dough and use cookie cutters to cut shapes.
- Bake at 400 degrees for 7-9 minutes on an ungreased baking sheet. Cool completely.
For buttercream frosting:
- Combine all ingredients in a small mixing bowl, adjusting water and powdered sugar as needed to achieve desired consistency. Mix until fluffy.
- Fill a piping bag fitted with a #3 tip with buttercream frosting, and set aside.
For royal icing:
- In a medium bowl, combine all ingredients and whisk until smooth. Consistency should be that of a thick syrup, similar to molasses. Adjust water and corn syrup accordingly.
- Separate royal icing into individual bowls, 1 for each color you'll be using, and mix in food coloring until it reaches desired color.
To flood cookies:
- Using the buttercream frosting in the piping bag, pipe an outline around the border of the cookie. Allow to set up for about 10-15 minutes before flooding.
- When ready to flood, use extra piping bags or a small spoon to drizzle different colors of royal icing onto each cookie.
- Use a toothpick to drag icing to the edges, without allowing it to spill over.
- Swirl with toothpick until you reach a desired pattern!
- Allow to dry for 2-4 hours.
Voila. Art on a cookie! That’s how you create these beautiful sugar cookie cutouts resemble changing fall leaves! Using cookie flooding as the cookie decorating technique, you can recreate these lovely fall leaves sugar cookies! Helllllllo fall!!


These cookies look beautiful, Sarah! I am so impressed by your decorating skills. I’ve never actually heard of cookie flooding before, so now I’m intrigued! I love that you frosted these leaf cookies. Sounds like this would be great for Christmas cookies as well!
Hi Gayle! Happy Monday to you! (Groooooan… Monday. Haha.) Thank you! Flooding cookies takes a little more effort, but they turn out so pretty! It’s really fun and the end result is worth it. 🙂 You should try it sometime! I’m planning to different versions for Thanksgiving and Christmas… hopefully I get to it! Thanks for your kind comment!
I’m not usually excited about baking Christmas cookies, but these fall leaf masterpieces have me heading out the door for the ingredients I need. They are so “painterly” ! I’d love to see what you do with a Christmas theme. Thanks for sharing.
I really meant to make Christmas cut-outs this year and to decorate them all fancy, but it just didn’t happen! It’s *definitely* on next year’s to-do list. I hope you tried these and that they turned out well for you! They’re laborious, but worth it! 🙂 Happy holidays!
These turned out gorgeous! I love using royal icing too. They definitely make some impressive-looking cookies. Instead of outlining in buttercream, I usually set aside some of the royal icing and add extra powdered sugar to it to make it stiff enough to pipe. I do like the the buttercream idea though! Pinning! Thanks for sharing!
-Michelle @ The Gracious Wife
Thanks for stopping by, Michelle! Have a great day! 🙂
That cookie flooding technique is one I’ve been meaning to try for years now but never have. These are beautiful Sarah! I think this may be the way we go for decorating sugar cookies this Christmas. Although mine won’t look like little van Gogh’s since I’ll have 3 sets of little hands “helping” by adding all the sprinkles in the house! 🙂
Haha! Those will end up as Van Gogh’s in their own right too though!! Sprinkles are definitely the more kid-friendly way to go! 🙂 You should try it sometime though! It’s more time-consuming, but it’s worth it. Hope you had a lovely Thanksgiving!!
Very Cute! They do look like real leaves! We would love for your to share at Party in Your PJs . I am sure our readers would love these
Hi Kim! Thanks so much for the party invite! I’ll pop on over there, for sure. Thanks for your kind comment, and have a wonderful evening! 🙂
Those look so pretty! You make it look so easy, but when I’ve attempted something like it’s been a nightmare.
Hi Frenchell! Sorry to hear that! I have had my share of kitchen nightmares! I had a disastrous recipe fail on Sunday that I’m still sad about. Haha. 🙂 For me, this technique is more time-consuming than anything. Not terribly difficult, but does take a little more time than doing a regular icing! Hope you try it again some time! Thanks so much for stopping by! 🙂
I’ve used this technique when painting . I absolutely love the result on cookies. Thank you for sharing at the Thursday Favorite things blog hop. Watch for your feature on Monday xo
Oh cool! I didn’t realize it could be used in painting too. That’s awesome! Thanks so much for the party, Katherine! And thank you for the feature! I’ll be sure to check back! 🙂
These are so beautiful, I think it’s barbarian to just eat them 😉
I would just look at them…. 😀 But I bet they are yummy too….. Such a dilemma !
Inviting you to shareyour recipe with my fall themed party Big Autumn Bash
Haha! It does make it hard to want to eat them when you’ve put hard work into them and they look so pretty. My S.O. said the same thing – they look too good to eat! 🙂 Thanks for your kind comment! I’ll see you over at the bash! I appreciate the invite. Have a lovely weekend!
Thank you so much for linking up with Big Autumn Bash !
Your cookies have been featured 🙂
http://milaslittlethings.com/2014/10/big-autumn-bash-party-features.html
Have a great week!
Thanks so much for the party! And THANK YOU for featuring my cookies! Have a wonderful day! 🙂
looove this beautiful tutorial! Can’t wait to make these cookies!!!
Thanks, Haley! I hope you try it – let me know how you do! Have a wonderful weekend! 🙂
These are so beautiful and creative. I hadn’t heard of this unique way of decorating cookies, thanks for sharing.
Hi Dina! Thanks for stopping by! Hope you try it sometime. 🙂 Have a wonderful weekend!
These are stunning! I’ve always wanted to try decorating cookies this way:)
Thank you, Ginnie! You should try it! Have a great weekend! 🙂
These cookies are almost too pretty to eat! Looks so good! Thank you so much for linking up at Tasty Tuesday! Your recipe has been pinned to the Tasty Tuesday Pinterest board! Please join us again this week!
Haha! We feel the same way! They’re so pretty and they do take some work – you almost hate to eat them. But they’re delicious too, so we still do it, of course! 🙂
Oh my goodness, this is so cool! I love the colors and the swirls! It’s so creative 🙂
Thanks, Kayla! It takes a little patience, but it’s a lot of fun! Hope you’re having a wonderful weekend! 🙂
Whoooaa…these cookies are seriously beautiful! This is the first time I’ve heard of cookie flooding – I definitely want to give it a try when I have some time. So cool. SO. COOL.
Thank you so much!! You should definitely give it a go! It takes a little patience, but it’s fun and it’s worth it! 🙂 Thanks for stopping by!!
These are so beautiful! I’m going to try them 😀
Thank you so much for the inspiration!
Awesome! I’m so glad you like them, and I’m excited you’re going to try them! Let me know how it goes. Thanks for stopping by, and for your kind comment! 🙂
The cookies look amazing. Pinned. Lou Lou Girls
Thanks so much! Thank you for hosting the party! 🙂
Sarah, your leaf cookies are absolutely stunning! I’ve always wanted to try cookie flooding, but the thought of it seemed so intimidating. Your instructions make it seem like a possibility for me:) Thanks for sharing the many pictures!
You should try it! It does take some time and a little patience, but it’s NOT hard! They have a fun, fancy look about them! Thanks, Heather! Hope you had a wonderful weekend! 🙂
wow. this is amazing and beautiful and i almost wouldn’t want to eat them!
b
Haha, we say the same thing! But we do it anyway because they’re also pretty darn good! Thank you so much for your kind comment! 🙂
Thanks for coming and linking up at #The Weekend Social. Please be sure to come back next week starting Thursdays at 9PM EST on KitchenDreaming.com ! I hope to see you there! Pinned
When I posted the link to this post on Twitter and FB I labeled them “Stunning Works of Art”. Fantastic! Thanks for linking up for Scraptastic Saturdays. This post will be shared via FB/Twitter/Pinterest. Have a wonderful day. Hope to see you next Saturday.
Aww, thank you! That was so sweet of you! See you at the next party!
Hi Sarah:)
Just had to see your amazing cookies “in person” after seeing them over at Katerina’s. They sure are a work of art and I bet mighty tasty too.
Thank you so much for sharing Sarah. This is my first time joining the Weekend Social Party and I plan on doing quite a bit of “tasting.”
Hi Louise! Thanks so much for the compliment! That was so sweet! Yes, they are very pretty! It’s hard to eat them and feel like you’re ruining them, but it’s worth it because they’re mighty delicious! Happy Friday to you! 🙂
These are the most beautiful fall cookies i have ever seen! Thanks for linking up to DIY Inspired! You’re going to be featured tonight at Handmade in the Heartland so be sure to stop by!
Oh, that’s great to hear! Thanks so much for the feature! I’ll be sure to stop by the party! Hope you have a wonderful weekend, Angela! 🙂
Your recipe is simply amazing! Breathtaking 🙂 Congrats on the good job!!
Hi Del! Thanks so much for your kind comment! Hope you try it sometime! Have a great weekend! 🙂
Really lovely! Add it to the growing list of thing I want to try.
Thanks so much, Cindy! My list is ever-growing too! Have a great weekend! 🙂
Those are so pretty, that’s such a great technique. Thanks for linking up to Sweet and Savoury Sunday, stop by and link up again. Have a great day!!
Hi! I love these! They are so pretty and I am going to make them this weekend… They are perfect for kicking off what really feels like the start of fall! But I was wondering if the icing dries and hardens on these. They are so pretty and I don’t want the icing to get ruined in transit if it’s still liquids/soft! If I’m going to make something this beautiful and delicious, I obviously need to share the wealth. Thanks!!
Hi Sami! I’m so glad you like them! Yes, the icing dries to a pretty durable finish. It does take several hours though and even overnight might be best. I meant to include vanilla or almond extract as flavor because, admittedly, Royal icing isn’t as tasty as buttercream, but obviously buttercream doesn’t work for cookie flooding. Add some kind of extract for flavor! Let me know how you do and if you have any questions along the way!
I will add some vanilla and let you know how it goes!!! Thank you so much! Do you recommend refrigerating them over night or leaving them out?
I’m thinking if you refrigerate them, the icing could crack as it dries?? I’ve never tried it though! I let mine sit to dry at room temp, and I’ve never had a problem. Once the icing is dry, they refrigerate and freeze perfectly well, but I think I’d let it dry at room temp! Good luck! 🙂
Wow! that is outstandingly gorgeous!
Thanks so much, Michal! 🙂
Thanks for posting these beautiful cookies Sarah! I actually succeeded at making them and I am the worst klutz in the kitchen! Any hesitant readers can check them out at: http://artofnaturalliving.com/2014/11/10/fall-sugar-cookies/ (I still can’t believe it myself).
They look fantastic! I’m so glad you tried them! They turned out beautifully! It’s time-consuming, but not hard, right? Thanks so much for sharing yours! 🙂
It blows my mind how simple and effortless you made this look! I try to make cookies like that and it always ends up looking like a disaster!
They really aren’t hard – just a bit tedious and time-consuming. Lol! But worth making every fall. Thank you so much, Eden! 🙂
Make sure not to compromise with the type of house that you are buying for yourself, however, keep an eye out for the budget as well. If you take a hasty choice in purchasing no salt water softener for you, it could cost you a lot of money because there are some people who are only looking to get each and every penny out of you. It is possible to wear out your cellular battery power in no time by any means. Author Resource:-After the well-publicized bankruptcy of Digital Domain, a Port St. It would be a lot easier to get the exact match to the client using refined search options. Due to low width of frame, there is possibility to add various applications that will attractively determine your brand and present attractive way of advertisement and marking of your business and company.5 . Mobile Technicians in Hicksville ensures that the mobile repairs are carried out properly. Wholesale Jerseys From China.Cheap NFL Jerseys China. Ultimately, going through added wardrobe in your one on one convenience is simply virtually all convenient anytime you help you find come with spilled who pot of coffee on your try-out costume.Flexibly and skill sets must be high enough to deal with sudden changes in work requirements. The persons who want your makeup service should find you trustable and dependable too.Wholesale Jerseys China. This is going to just be more an additional disruption for that users (all those resolving on whether or not to placed someone or not satisfying you).Visit my site:http://www.cheapnfljerseysdiscount.us.com/
Reasons To Buy• Quickly enhance your understanding of "J.Here are some reasons behind the execution of SHRM. The disadvantages are; it has a higher level of spatter and it is limited to short circuit and globular transfer. Cheap Football Jerseys China Free Shipping..All you have to do to access the clipboard is go to the Home tab and find the Clipboard panel on the far left and click on the dialog launcher. An 8 loves to solve problems.Cheap Football Jerseys Wholesale. The company operates in the US, Canada, China,Cheap Jerseys China Wholesale, Mexico and Australia. It is amazing how the Spirit can send us messages that everyone can learn to understand. During the beginning stages people ignore the discomfort but before the pain makes your life miserable you should try something to improve joint health naturally. Besides pepper and salts, such grinder can also be an ideal machine to convert whole items into powder forms. This should then allow the customers to witness a demonstration before making a purchase. A 4 is dependable and not as much “fun” as a 3.Visit my site:http://www.cheapfootballjerseysshop.com/
Those look very pretty, I would also want to try that for Christmas cookies! great Idea!
Thank you so much!! 🙂
These are really pretty, but just an FYI…this is not royal icing. Royal icing always has meringue powder or egg whites. Without that this is glaze. I like the technique and finished look!
Yes, you are so right! Thank you so much for sharing that info. This post is quite old, and it would definitely benefit me to update the notes, directions, and photos soon! I’ll have to to make a note to do it for next year. Thank you for your comment!!
Just letting you know that your recipe and instructions are still coming in handy 🙂 I made these with my kids last weekend and enjoyed how the colours blended and each leaf was unique. They looked beautiful all together. I lost the kids at one point but I think they were intrigued by the technique itself. They came back to do the quicker pumpkin and footballs lol
Yay! I am so happy to hear that! These are a labor of love, but they are so worth it. They make such a pretty cookie, so fun for getting in the fall spirit. I would think the kiddos would love the swirling part of the process, and then check out after that. Haha. I’m so glad that you come back to this again for guidance! Thanks for sharing. 🙂
Love these! I used a larger tip than I should have but they still turned out good! It was a little hard to get the details of the cookie.
They’re a bit tricky and time-consuming, but worth it, right? Send a photo of how they turned out for you!!! Thanks for sharing your feedback. 🙂
Made these for the senior ladies home I work at. They are simple to make and so cute. I used maple flavored frosting for them. Staff and the ladies are in love and so am I.
Aww, that’s amazing! I’m so happy to hear that. Thank you for sharing. 🙂
We used your icing recipes and techniques on sugar cookies this weekend and received many compliments! Thanks! I had a bit too much buttercream, and just the right amount of flooding icing.